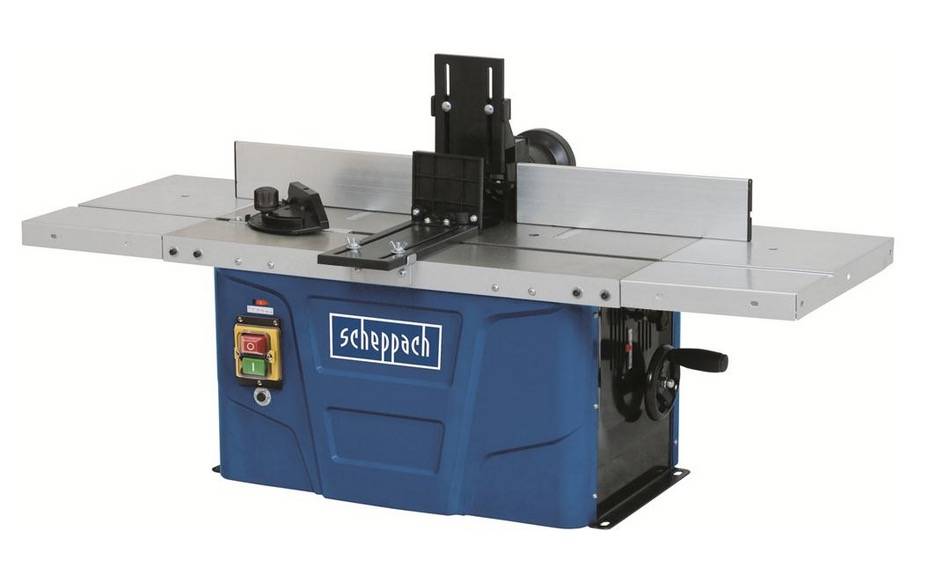
Scheppach HF-50 Spindle Moulder

The Scheppach HF-50 Spindel Moulder/ Router Table. Photo: Scheppach

In North America, a table saw is often used to cut dados (square sectioned grooves). A stacked dado blade set is a sandwich of blades to be fitted onto a table saw for making dados and rabbets. There are two rim (outer) blades. These differ from each other and are referred to as the left rim and the right rim blade, respectively. There is also a series of chippers, specially-designed blades that fit between the rim blades, as well as dado shims aka spacers, that lack any cutting features, but vary in thickness. They can be made of metal or plastic. These ensure that the dado is the precise width that is needed.

The arbour (the axis or shaft that supports and rotates the blades of a table saw) has to be long enough to accommodate the stacked dado blade set. This is the challenge with European table saws. Their arbours are too short to accommodate more than a single blade, and still allow the nut to be fully threaded onto the arbour when the blade is tightened. Thus, making dados is a task that is normally done with some form of router in Europe. The main problem with this approach is that there are is not an unlimited choice of router bits to select from.

While most routers are portable machines, something approaching a table saw is also available, but with a rotating vertical shaft, rather than a horizontal shaft. The spindle moulder (British English)/ wood shaper (American English)/ router table (General) comes with a motor, frequently housed below the table surface.

The Scheppach HF-50 is a machine for DIY enthusiasts, rather than professionals. The author’s many different Scheppach tools, were all purchased for work on a house renovation project, and are not intended to be kept beyond its completion. These are not especially durable machines. The main reason the HF-50 was purchased, was the lack of choice. Professional machines cost five times more than the NOK 3 300 (USD 300) spent, and at least twice as much used. The HF-50, and many other machines, will be replaced by the end of 2023 with a CNC machine, probably with a router as well as laser cutter. It may even include a plasma cutter. Such a machine costs about 20 times the price of a router table, but will provide greater production flexibility.

In contrast to a router, stock (the unprocessed wood) runs along a vertical fence from right to left. Viewed from in front of the infeed, the cutter head can be described as a right-hand vertical side head. Other configurations include a bottom horizontal head, a left-hand vertical side head, and a top horizontal head. A single head moulder will only cut one surface at a time. It is common for multi-head moulders to have up to four heads.

The spindle is height adjustable from 0 to 40 mm. While most spindle moulders rotate between 3 000 and 10 000 rpm, the HF-50’s speed varies from 11 500 to 24 000 rpm, close to that found on a portable router. The cutters shanks have a diameter of 6 mm / 8 mm / or 12 mm. Power on the HF-50 comes from a 1 500 W motor. Other spindle moulders may have as little as 750 W, to as much as 5 000 W per head.

Hearing, eye and respiratory protection are necessary when using a spindle moulder. The machine itself is usually equipped with a guard above the cutter, to protect hands and prevent garments from being drawn into its blades. Hold-downs and feather-boards can also prevent injury.

There are two major jobs intended for the spindle moulder. The first is to use it to make drawers for kitchen cabinets. This will follow some of the advice of John Heisz in his video, How to Make Drawers the Easy Way, with additional information provided by Gary Katts in the video, The Quarter-Quarter-Quarter Drawer System. Quarter inch is translated as 6 mm.

The second is to make moulding that for LED strip lighting, that will be covered with translucent plexiglas. This is a relatively simple design, that will allow much of the house lighting to be DC powered. Electricity will be supplied using Power over Ethernet (PoE) standards. PoE cables are in place throughout the house.

In addition, I intend to make an oak table from counter-tops. Since the width of the table is 900 mm, while a counter-top is 600 mm, this means two edges will have to be planed, using a spindle moulder, rather than a jointer. This eliminates one more tools from the workshop, saving space.

After these three projects are completed there will undoubtedly be other projects that will use the capabilities of a spindle moulder.

Note: This post was originally started 2018-03-18 15:23:25. Its original title was Workshop Tools: Shaper.

Whetstone Sharpener: A tidbit

A Scheppach TiGer 2000 Whetstone Sharpener. Photo: Scheppach.

At my local hardware store (Jula), there are electric grinding stones in all price categories from NOK 250 to 3 200 (USD 32.50 to 416). I paid NOK 1 500 (USD 195) for mine. Why this price difference?

Depending on your worldview, the Rolls-Royce, Maybach, Cadillac, Zil, Toyota Century or Trek (yes, the bicycle) of the grindstone world is Tormek, a Swedish manufacturer. If you want to be convinced that one should spend more money on a whetstone sharpener, there is a YouTube video that explains everything, Why does the Tormek T-7 and T-4 cost so much? Interview and review with Stig from Sweden: https://www.youtube.com/watch?v=ESW3wy0PI18

Not being convinced, I opted for a Scheppach TiGer 2000 S, which looks like a plagiarized version of the Tormek T4. The T4 is undoubtedly better. One person suggests 20% better, whatever that means. It also comes with a 7 year guarantee.

While larger diameter grindstones are preferred to this 200 mm machine, because they provide a larger concave grind on edge tools, these larger machines also need a more powerful motor and housing, making them more expensive.

While the unit comes with both a straight jig and an angle guide, some users may want to invest in a wheel dressing jig to flatten/ true the stone edge. Specialist jigs are available for knives, woodturning tools, axes and scissors.

Mount the stone wheel and plugging it in, is all that is needed to set up the machine. The metal shaft is strong. However, the sharpening jig fits loosely. Many reviewers have commented that a Tormek jig is much better. The 120 W motor is more than adequate. Most tools can be ground adequately. The leather honing wheel is also adequate.

Note: The first three paragraphs of this tidbit were originally written: 2018-03-18 at 07:15:29 with the title Workshop Tools: Whetstone Sharpener. Since then it has been waiting for further inspiration, that has never arrived. On 2020-03-08 at 23:00 the text was edited into blocks using the new(ish) Gutenberg block editor, rather than the Classic editor used in 2018. The title was changed to Whetstone Sharpener: A tidbit. The last three paragraphs were added, along with an illustration of the Scheppach TiGer 2000. Prices in NOK were identical in 2018-03 and 2020-03. However, the Tormek had increased its price to NOK 3 800. In 2020, 1 USD is worth almost 10 NOK, this will also influence price comparisons.

Managing fastenings

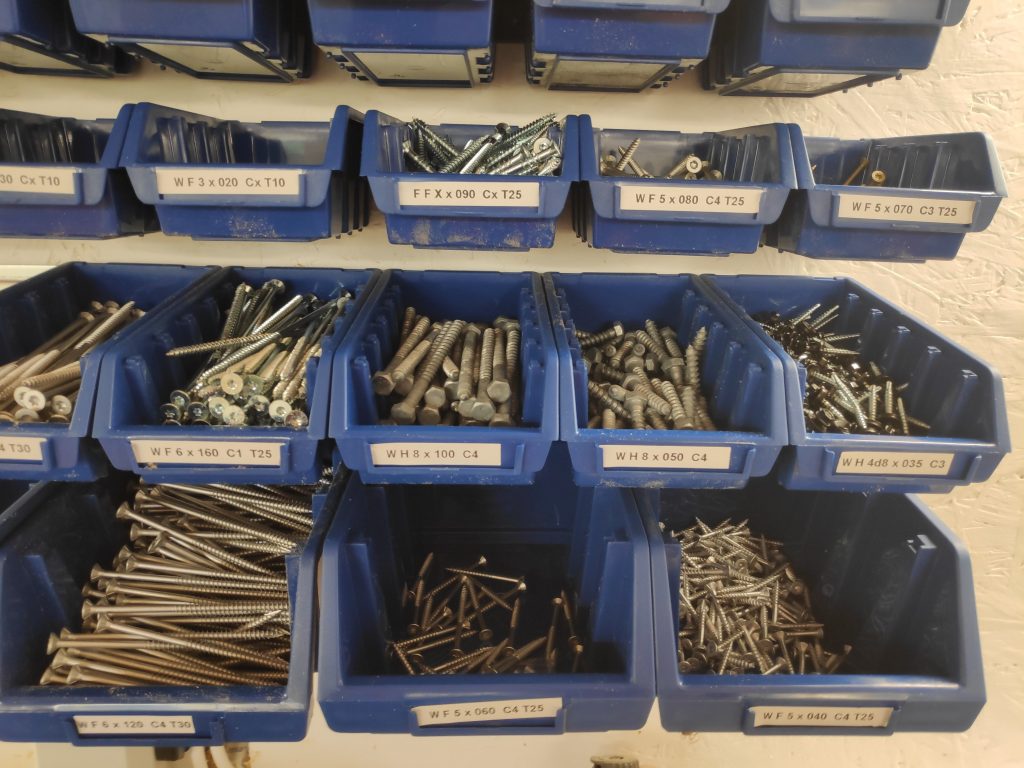
Some of the workshop bins for fastenings at Unit One. The large bin at the bottom right holds the type of screw described in detail in this post.

Most workshops worthy of the name face a challenge managing their fastenings. A fastening (British English) or fastener (American English) is a hardware device that mechanically joins/ affixes two or more objects. In general, these create non-permanent joints, that can be removed/ dismantled without damaging the joining components. Examples include: bolts, nails, pins and screws.

Some fastenings are kinder than others. I note that many tradespeople make use of nails, where I instinctively prefer to use screws. Presumably there are others who would regard my choice as reckless, because bolts – with washers and nuts, would be make even more solid, yet removable, joints.

Bins

This past week, Unit One, my personal workshop at Cliff Cottage began installing bins to hold fasteners, and other workshop components. There are four sizes of bins in use, although several more sizes exist. Three of them have a width of 115 mm and a height of 75 mm. The three lengths are 113, 162 and 213 mm. In addition, the fourth has a width of 170 mm, a height of 126 mm, and a depth of 240 mm.

Plastic tracks are used with the two smaller sized bins, while metal ones are used with the two larger ones. There are four locations in the workshop where bins can be placed. One of these has been built out, with a second in the process. Both of these hold six rows/ levels of bins, each 100 mm apart, with a length of 980/ 1 000 mm, using two lengths of track – plastic = 490 mm long, or metal = 500 mm long.

One of the locations waiting for bins can accommodate sic rows, like the locations mentioned previously, while the other can only accommodate three rows, in both cases using three lengths of track, for a length of about 1 500 mm. The location with only three rows is located in the workshop annex, which is mainly for the shop compressor and dust extractor, as well as a spray booth for painting/ coating. The bins here are not for fastenings, but for tool spares and other related parts.

Because of the height difference, the largest size bin is designed to be fitted only onto the lowest level of track, and only in locations with six rows of bins.

One of the main advantages of using bins is that each bin can be moved, hopefully to a more appropriate location, either for work or for storage. Today, for example, I was screwing in some Toolflex tool holders, and was able to carry a bin of screws to the work location. On previous occasions I would probably stuff my pockets with screws.

Labels

One of the main reasons why Hard Head (HH) bins were purchased, rather than the more common and similarly sized Eurobin, was the ability of the HH bins to hold labels, whereas Eurobins have their own, more expensive solution.

The label for one of my more commonly used screws has the following code; W F 5 x 40 C4 T25. For most people this is meaningless, but for me it contains all of the information I need to know. W = wood screw, the type of fastening; F = flat head, or what some people call counter-sunk, the most common type of wood screw; 5 = 5 mm, the screw diameter; 40 = 40 mm, the screw length; C4 = Corrosion class 4, making it suitable for outdoor use in maritime climates; T25 = Torx 25, the size of bit/ driver used to install/ remove screws.

While there are some fairly common abbreviations regarding fastenings, there is also variation. Thus, I have no guilt inventing my own codes to be used at Unit One.

Fastening types: B = bolt; C = clamp; D = dowel; M = machine screw; N = nail/ spike; P = pin; W = wood screw.

Head types: A = Allen/ hex key; C = carriage; E = eye; F = flat or counter-sunk; H = hexagonal; R = round. For bolts: N = nut; W = washer.

Material classes/ types: C1 – C5 = Corrosion class; EP = electro-plated; G = galvanized; A2 = the most common stainless steel class, with corrosion class 4 characteristics; Al = aluminum; Bs = brass; Bz = bronze.

Torx size: T01 to T100. Torx is the standard drive type at Unit One. It allows for a higher torque to be exerted than a similarly sized head using another type of drive, without damaging either the head and/or the tool. Slotted, Phillips or Pozidriv heads that accompany purchased products are almost always recycled, immediately.

An aside: As a Canadian, I used Robertson screws in my youth, initially when building a Sabot sailboat, when I was 13 – 14. These have a tapered square socket in the screw head and a tapered square protrusion on the drive. The drives are coloured in the following order, from smallest to largest: orange (#00), yellow (#0), green (#1), red (#2), black (#3) and brown (#4). It is from using these, that I developed a distrust of Phillips and an aversion for slotted screws, that has continued to this day. Reluctantly, I have to admit that Torx screws perform better than Robertson screws.

Inventory Control

The Unit One workshop does not have a logistics department, nor does it operate on just-in-time principles. The main challenge is to have a supply of fastenings (and other materials) on hand, that can be used when a problem/ challenge emerges. Thus, the workshop is over-supplied with inventory. Items are purchased on a when-in-town and just-in-case basis. Town here refers to Steinkjer, Trøndelag county seat, about 32 km away with its Biltema, Clas Ohlson and Jula shops, all Swedish chains, typically with an oversupply of male customers.

The following is an example of just-in-case thinking. Woodscrews include the following lengths: 16, 20, 30, 40, 60, 90, 120 and 160 mm. There are also some historic 70 and 80 mm long woodscrews, but these sizes will not be replaced when they are used up. Instead, 90 mm screws will become standard. In addition, there are some woodscrews that are used for specific purposes, such as terrace screws, that would be coded: W F 4.2 x 55 A2 T20. Decoding this is left as an exercise for the interested reader.

Where possible, corrosion class C4 screws are used both indoors and outdoors, for there is no need to have a supply of screws that can only be used indoors. That said, it is difficult to find smaller dimension screws (lengths <= 30 mm) that are corrosion protected.

Ethan & Ethel 05: First Stationary Machine

Today, Monday, 2018-08-13, the real-life Ethan is 16 years old. Happy Birthday Ethan! This date also marks the day when I have spent precisely half my life as a father.

Ethan & Ethel are wanting to improve their woodworking workshop by buying a stationary machine. They estimate that using this type of machine can increase their production capacity. Because these machines are expensive, they will have to plan which one to buy first. They are thinking that if they make the right investments, they will be able to build things that others want, and make some money. For example, they have an aunt who wants a garden shed, other relatives who need new kitchen cabinets; and family friends who want hardwood furniture. However, they can’t build all these things at once, and decide to concentrate on building garden sheds.

There are many designs for garden sheds. Usually they are small uninsulated buildings. Ethel & Ethan are thinking of using softwood lumber for framing, then covering it with OSB. When they made up a cut list, they realized that they should build it using full sheets of OSB. That means dimensions of 1 200 mm, 2 400 mm or 3 600 mm. Beyond that, and the buildings would be far too big with their limited skill sets. They decided that their first building should be 2 400 mm long by 2 400 mm wide by 2400 mm high at the eaves. At the ridge, it would be 600 mm higher, or 3 000 mm.  It is a small shed, but there is less that can go wrong, and less time and equipment is needed to make it.

They started thinking about pre-cutting the pieces for one shed to save time in the short building season. Then they thought that if they could pre-cut one, they could precut more. Then they contacted other people in their network to see if they could find buyers. After these conversations, they estimated that they could build and sell five of these small sheds in the summer.

They want to buy a chop saw, and know the maximum dimensions of the material they will be working with on the sheds will be about 50 mm by 100 mm. What they really want is a flipover saw, such as a DeWalt DW743. One challenge with this model is its inability to cut joists, if they work on bigger projects. The saw was originally made by the German power tool company, ELU, that was bought by DeWalt in 1994.

At the Unit One workshop, a Ryobi compound sliding mitre saw is used. It was selected because of price, and the fact that the sliding mechanism is in front of the saw. This prevents it from being used with materials thicker than about 100 mm. Most sliding saws go back towards the wall, which means that the saw has to be set further forward, increasing the amount of space used. Perhaps the best mitre saw is a Bosch axial-glide saw. Its main disadvantage is price, costing almost four times that of a Ryobi.

Lumber dimensions: A 2 × 4 when dressed is 1-1/2″ × 3-1/2″ or 38 mm × 89 mm. In Europe it is 48 mm x 98 mm.

A sliding compound mitre saw and a plunge saw make a versatile pair. Table saws are more dangerous than either of these saws, because the operator holds the material being cut, instead of the saw, making it easier to accidentally move hands into the spinning blade.

Ethan & Ethel 04: Computer Control Basics

In the last post, Ethan & Ethel had to do a lot of work, to keep track of their heating costs.

Time used = Time turned off – Time turned on.  Example: 17h05m –  15h31m = 94m

They wrote down the time they turned on their heater, and then the time when they turned it off. They then subtract the “on” time from the “off” time to find the number of minutes the heater was on. This had to be repeated for every visit to the workshop with heat on. At the end of the month, they had to add all of these minutes together to find their monthly usage. What a boring job, and so unnecessary when a computer can do it, automatically! All that is needed is a few lines of code. Code that has already been written, and is waiting to be reused.

Workshop computer control means that computing equipment is running hardware and software that senses and activates workshop activities.

Stop the Press!

This post was originally written 2018-03-02. It is now 2018-08-11, more than five months later. Reviewing it at the time I was dissatisfied with the previous paragraph, that continued with, “a Raspberry Pi single-board computer will be used to run Home-Assistant software. The raspberry pi will be connected to two different Arduino micro-controllers using USB cables.”

The problem, both then and now, is that while the above solution would work, it is not optimal. Why should one use three components, when one should do? Ideally, a single microprocessor should be able to run 1) home automation software, in this case Home-Assistant; 2) connect to analogue sensors and have analogue input data converted to digital data; 3) connect digitally to relays to trigger activators; 4) communicate with other components on the local area network using wires (Ethernet); 5) receive electrical power over those same wires.

The best way forward to gain an understanding of workshop problems is to pretend that the ideal solution exists, a fantasy Unicorn IoT (Internet of Things) microcontroller.

Home-Assistant

If Ethan and/or Ethel are to work in a computer controlled workshop, one of the first things they need to control is the workshop computer. It should be designed in such a way that it can respond to their needs turning on and off lights, heat, tools, etc.

While a Raspberry Pi (and its clones and near relatives) is capable of running this software, an Arduino microcontroller is not.

Sensors

In a workshop there can be a large number of different sensors measuring all sorts of things. There can also be a large number of actuators using the same data. For example, both a heater and a vent may use data from a room temperature sensor, but in different ways. The heater may be activated if the work space is too cold. Once it gets hot enough it will shut off. If the temperature continues to rise, then a different actuator, the vent will be activated, but only if the outside temperature is lower than the inside temperature. To determine that, there needs to be a second temperature sensor, this one measuring the outside air.

A sensor is any device that measures a physical quantity. Temperature sensors can be found not only in the workshop space, but also inside machines.  This Wikipedia article lists sensors by sensor type: https://en.wikipedia.org/wiki/List_of_sensors

Some of the other sensors in a workshop include: humidity, measuring water vapour in the air; infra red, detecting body heat; light, measuring light levels; smoke, detecting fires. Those are sensors that can be used anywhere in a house. There can be some sensors that are specific to a workshop: wood moisture content and dust particles in air.

Having so many sensors can be a major distraction, so from now on the focus will be on just one, a LM35 temperature sensor.

LM35 Temperature sensor

Several companies make temperature sensors, but Texas Instruments makes one that is world famous, the LM35. It costs about $1.50.

LM35
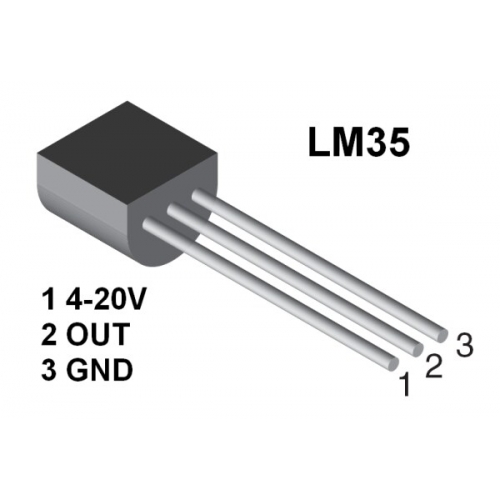
A LM35 temperature sensor, inexpensive and accurate. At pin 1 any voltage can be used from 4 to 20 V. Pin 2 provides output that will be connected to an analog pin. Here, the voltage proportional to the temperature. It can vary from -0,5V to +1.5V. Pin 3 is the ground (or negative terminal). It completes the electrical circuit..

While information about the LM35 is available in a data sheet that contains more than enough information about every aspect of the sensor, most people don’t need to read it. Why? Because all of the engineering work has been done before. Since Ethan and Ethel will be using an Arduino, they just need to know how to connect a LM35 with an Arduino. Then they have to find a (free) program that uses the LM35, and upload it onto the Arduino.  With a little practice, anyone can get a sensor working on an Arduino in about five minutes.

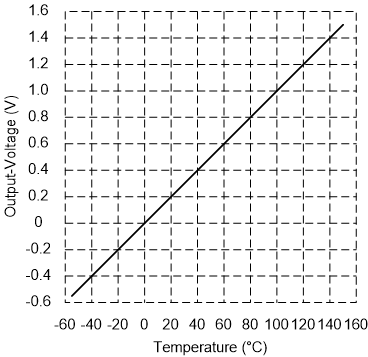
The LM35 is cool. The main reason is shown in this graph. Most sensors express themselves as a voltage that varies smoothly with the quantity being measured. On a graph this makes a straight line. The LM35 is exceptional, because at 0°C output voltage  is 0V. Every 1°C up or down adds (with positive temperatures) or subtracts (with negative temperatures) precisely 10 mV. At 100°C, the output voltage is exactly 1V. The LM35 is also very flexible regarding input voltage. It can use anything from 4V to 20V.

LM35 graph
This may be the first time in your life where you see a graph that is actually useful! This shows the output voltage of a LM35 temperature sensor for temperatures that range from  -50° C to  +150° C.


ADC

Computers use digital data, and can’t normally read voltages directly. On micro-controllers there are Analog to Digital Converters (ADC) that automatically change an input voltage into a digital value. On the Arduino Uno, there are six analog pins that can read voltages from 0 V to 5 V (or 0 mV to 5 000 mV). This means that up to six different sensors can be connected to an Arduino board. There are ways to add more, if needed. Each sensor then has its voltage converted into a digital values between 0 and 1023. These analog pins have a sensitivity of 4.9 mV. So a voltage from 0 to 4.8 mV will be given a value of 0. From 4.9 mV to 9.8 mV they will be a value of 1. This will continue right up to 4 995.1 mV to 5.0 mV, where they will be given a value of 1023.

It takes about 100 µs (100 microseconds or 0.0001 s) to read an analog input. The maximum reading rate is 10 000 times a second. Usually, reading a temperature once a second is good enough. In fact, in some circumstances reading it every five minutes or every hour would make better sense, especially if all this data has to be stored.

Arduinos have ADC units, Raspberry Pis do not.

Relays

Microcontrollers do not respond well to large currents, and will be permanently damaged if connected to too many volts, amps or watts. If one wants to turn on an electric heater to warm up a space, this is typically done by a relay.   A Relay is an electrically operated switch. When an electromagnet is activated with a low voltage, typically 5 V, it makes or breaks a high voltage circuit.

Many microcontrollers have supplementary boards that attach directly to pins on their main boards. Both the Raspberry Pi and the Arduino have them. On a Raspberry Pi they are called  Hats (Hardware Attatched on Top). On the Arduino they are called shields. The Raspberry Pi hats allow the main board to identify a connected hat and automatically configure the pins.

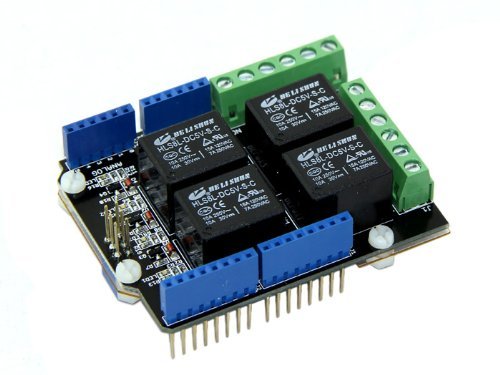
A Seeed Relay Shield V 2.0. It allows a single Arduino to control up to 4 relays. (Photo: Seeed)

Communication

For automation systems, wired communication is preferred. The most common form of wired communication is the Ethernet, developed at Xerox PARC (Palo Alto Research Center) in 1973-4 and used ever since. Most people would be advised to use CAT 6A cable, for workshop automation.

In the future, almost every significant power tool in a workshop will be connected to the local area network, including dust collection and air filtering equipment. Even in home workshops, various variants of CNC (computer numeric controlled) equipment will be taken into use, including 3D printers and laser cutters.

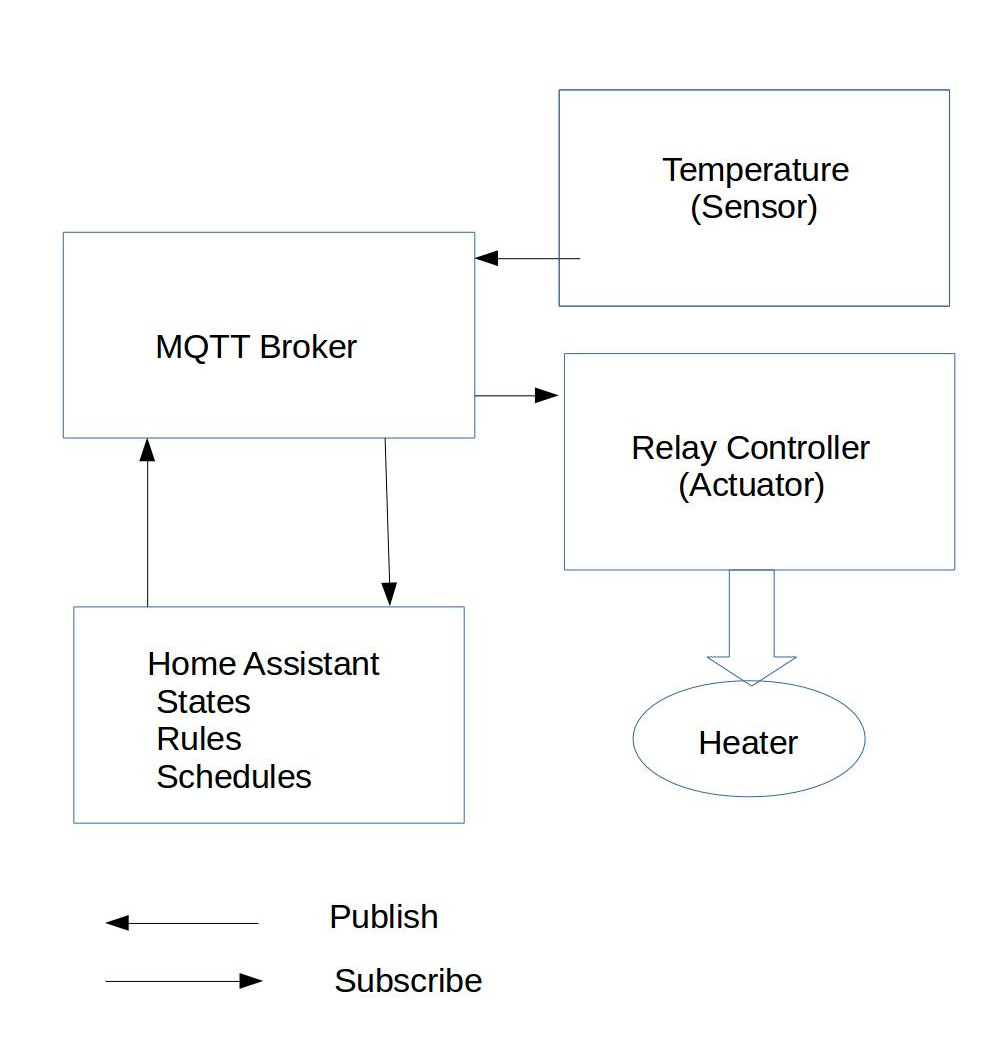
Microprocessors in the 1970 would process data in a single program that ran continuously. In the 21st century, not so much. The reason for this is that each sensor (and each actuator) is treated as a separate object. Sensors publish data, about a specific state, and actuators subscribe to the data they need to make decisions about how they will operate. To do this they use a publish-subscribe protocol called MQTT. It has been around sine 1999.

Sensor actuator
Home Assistant uses a MQTT broker that allows sensors to publish and actuators to subscribe. With this information, a heater can be turned on and off as required.

PoE (Power over Ethernet)

Power over Ethernet allows electrical power to be sent over the same Ethernet cable used to send and receive data to a device. This simplifies life considerably. There are no batteries to change or high-voltage power cables to install. The main challenge is that only a few microcontrollers are capable of utilizing this feature. Using a Hat or shield with PoE connectivity is another possibility.


Protective Gloves

While everyone knows that a glove is a garment covering the whole hand, not everyone is familiar with gloves as Personal Protective Equipment. There are 3 categories of gloves specifying levels of risk. Category 1 is for simple gloves, for minimal risks only. Cleaning and gardening gloves are often found here. Category 2 is for intermediate risks, those that are neither minimal nor deadly/ irreversible. This includes gloves offering good puncture and abrasion performance. Category 3 is for irreversible or deadly risks, and gloves in this category must be designed to protect against the highest levels of risk.

Work gloves for woodworking are classified in category 2. Some of the functions that that can be important are: protection against cold, protection against cuts, and water protection – either water resistant or waterproof. Durability and versatility are also important considerations. In addition, gloves should fit! Poor fit can reduce performance and/or protection, and increase the risk of chafing and injury.

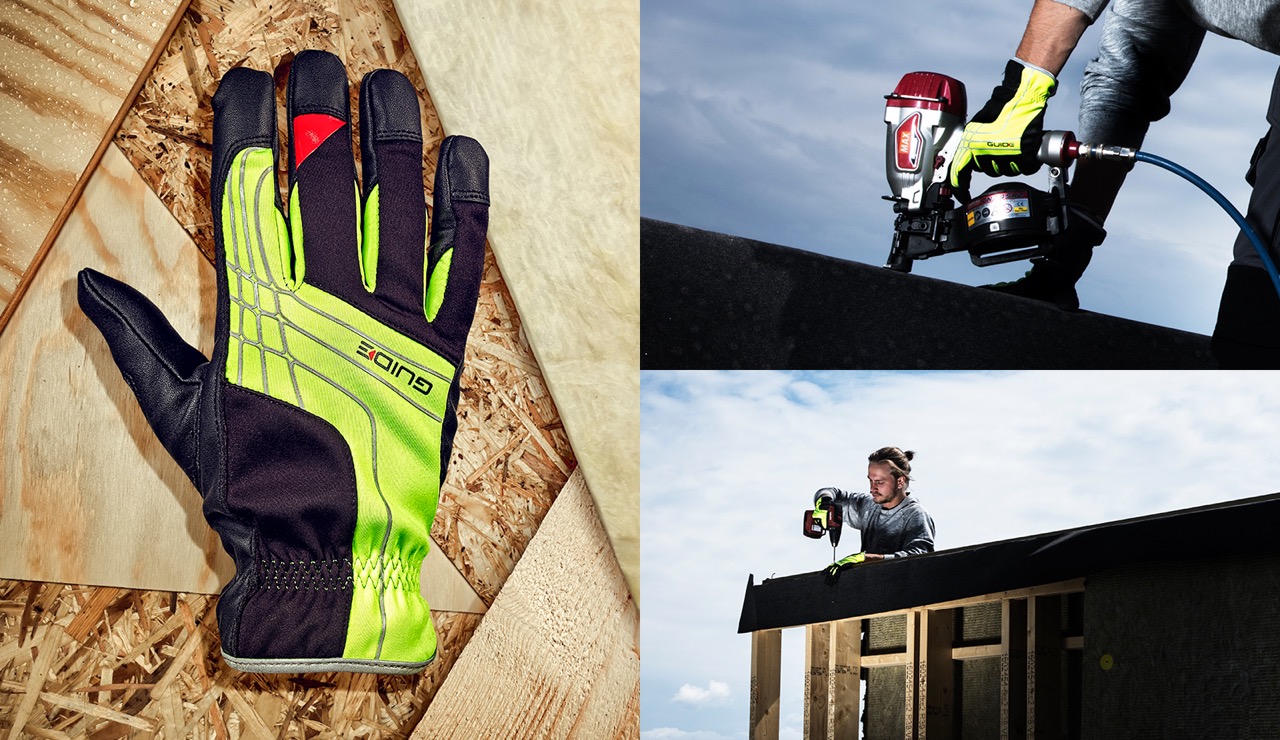
The Guide 5002 glove for outdoor workers in fields as divergent as construction and kindergartens.

Glove size is dependent on hand width and length. To find circumference, wrap a measuring tape around dominant hand (without thumb) just below knuckles, and make a fist. To find length measure from the bottom edge of the palm to the tip of the middle finger. Despite standards, measurements don’t always help.

Personally, I have a circumference of 275 mm (EU-10), but a length of 210 mm (EU-11). However, after spending an hour at a local store selling PPE and attempting to try on several pairs, the results were: Size 10 was hopeless; size 11 felt tight; I ended up with a size 12, as shown in the photo below.

These red gloves, suitable for woodworking, were only available in one colour combination red and black. They were the only work gloves sold by the shop in size 12.


In Europe, there are a number of standards (EN = European Norm) for gloves. EN 420 provides general specifications, EN 388 defines levels of protection against mechanical risks (abrasion / cut / tear / puncture) and electronic discharge, while EN 511 addresses cold and wet issues. Other standards extend requirements for special uses, such as welding EN 12477.

EN 420 specifies some general requirements for protective gloves. For example, it requires that the gloves themselves should not impose a risk or cause injury; that their pH be as close as possible to neutral. It also addresses allergy issues. For example, chromium content is limited to a maximum of 3 mg/kg (chrome VI). It also specifies hand size requirements.

1. Resistance to abrasion

Based on the number of cycles required to abrade through the sample glove (abrasion by sandpaper under a stipulated pressure). Performance level 1 to 4, depending on how many revolutions are required to make a hole in the material. The higher the number, the better the glove. See table below.

2 Blade cut resistance

Based on the number of cycles required to cut through the sample at a constant speed. Performance level 1 to 4.

3 Tear resistance

Based on the amount of force required to tear the sample.
Performance level 1 to 4.

4 Puncture resistance

Working with electronic components can require that gloves be used to reduce the risk of electrostatic discharge. A pictogram will indicate if gloves have passed the relevant test.

EN 511 measures how the glove’s material leads cold (first digit, convective cold with performance level 0-4 where a higher number is better ), as well as its the material’s insulating capacity, with contact (second digit, contact cold with performance level 0-4). A third digit shows if water penetrates the glove after 30 minutes.

Many glove manufacturers have detailed information about their products, and protection standards. This is true of Australian Ansell Limited and the Swedish, Skydda Protecting People Europe AB, which markets products under the name Guide.

Living in Norway, I try to support Scandinavian companies.  Skydde PPE has its own YouTube channel. Most videos on the channel are in Swedish, unfortunately: http://guidegloves.com/en/guide/film.html At least two of their videos are made in Bergen to emphasize gloves that protect against wet and cold (in a kindergarden) in addition to mechanical injury (carpentry). Here the spoken Bergen dialect is texted into Swedish.


Workshop Tools: Gloves

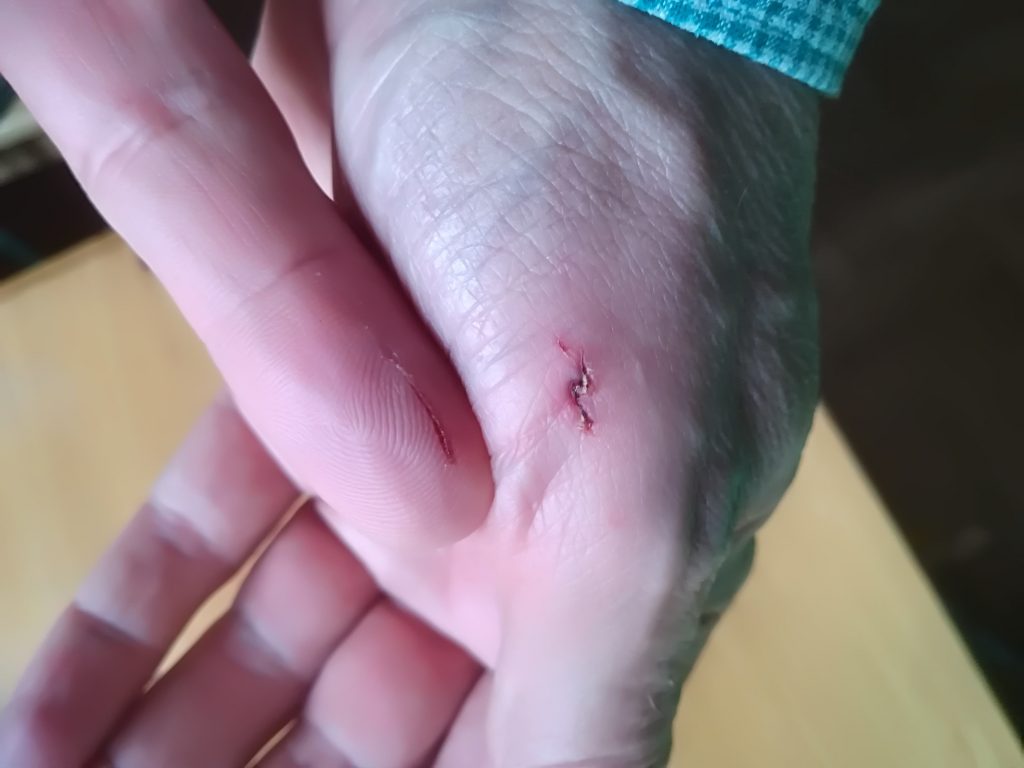
Take a close look at the following photo, and you will see the hands of an idiot who was not following safety procedures. He was not wearing gloves.  Yes, he can find extenuating circumstances to explain away both incidents. The injuries are minor. That is not the point. Both incidents could have been avoided if gloves had been used.

Unnecessary injuries caused by not wearing gloves.

People who work with sharp tools should wear gloves. It should be part of the kit!

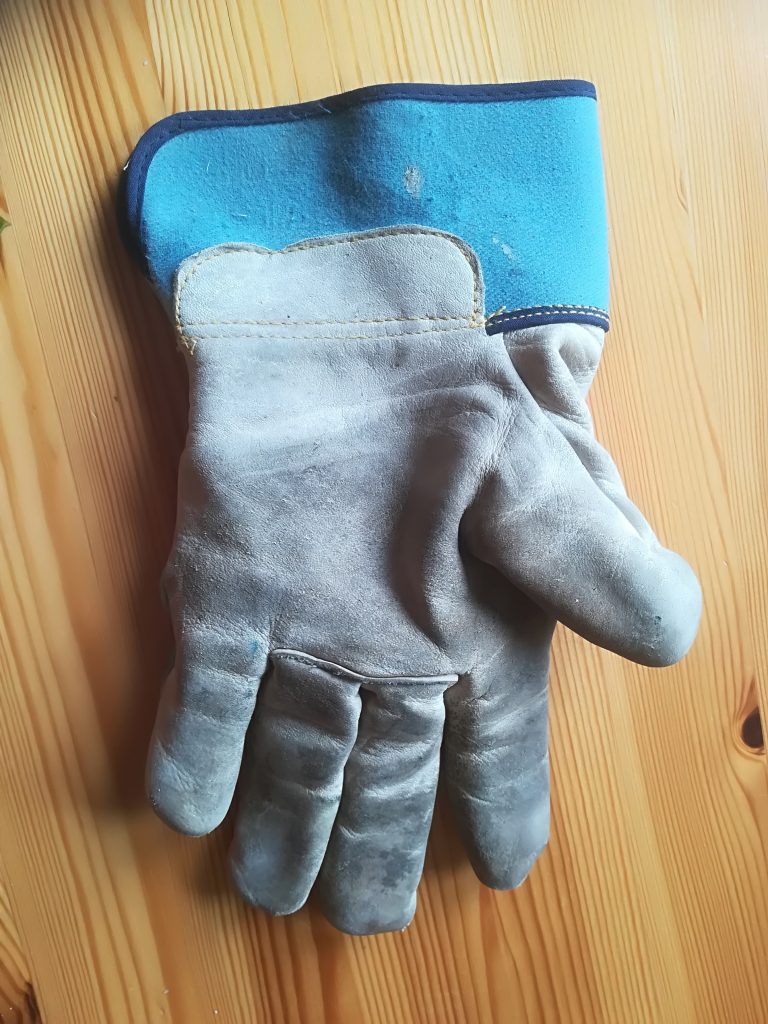
A glove, part of the safety equipment every woodworker should learn to wear.

Workshop Tools: Electric Plane

A plane is a tool for shaping and smoothing wood. In the pre-industrial period hand planes were used to flatten, reduce the thickness of, and dress (smooth) rough lumber. Most of this work is now done by electric planers (aka thicknessers). Special types of planes were also used to cut joints or mouldings. A typical example is the rabbet plane. Today, a router or shaper is used for this work, although – increasingly – specialized tools are used.

In a workshop, the most important use of a plane was to integrate surfaces on workpieces. It is here that the electric plane has taken over, although it is unsuited for many delicate jobs that must still be entrusted a manual plane.

An electric plane is a portable machine that uses rotating knives to smooth a surface. The main reason for using an electric plane is to save time, “In  1918 an air-powered handheld planing tool was developed to reduce shipbuilding labor during World War I. The air-driven cutter spun at 8000 to 15000 rpm and allowed one man to do the planing work of up to fifteen men who used manual tools.” https://en.wikipedia.org/wiki/Plane_(tool) referencing Planing Ship Timbers with Little Machines, Popular Science monthly, December 1918, page 68, Scanned by Google Books: https://books.google.com/books?id=EikDAAAAMBAJ&pg=PA68

bmd
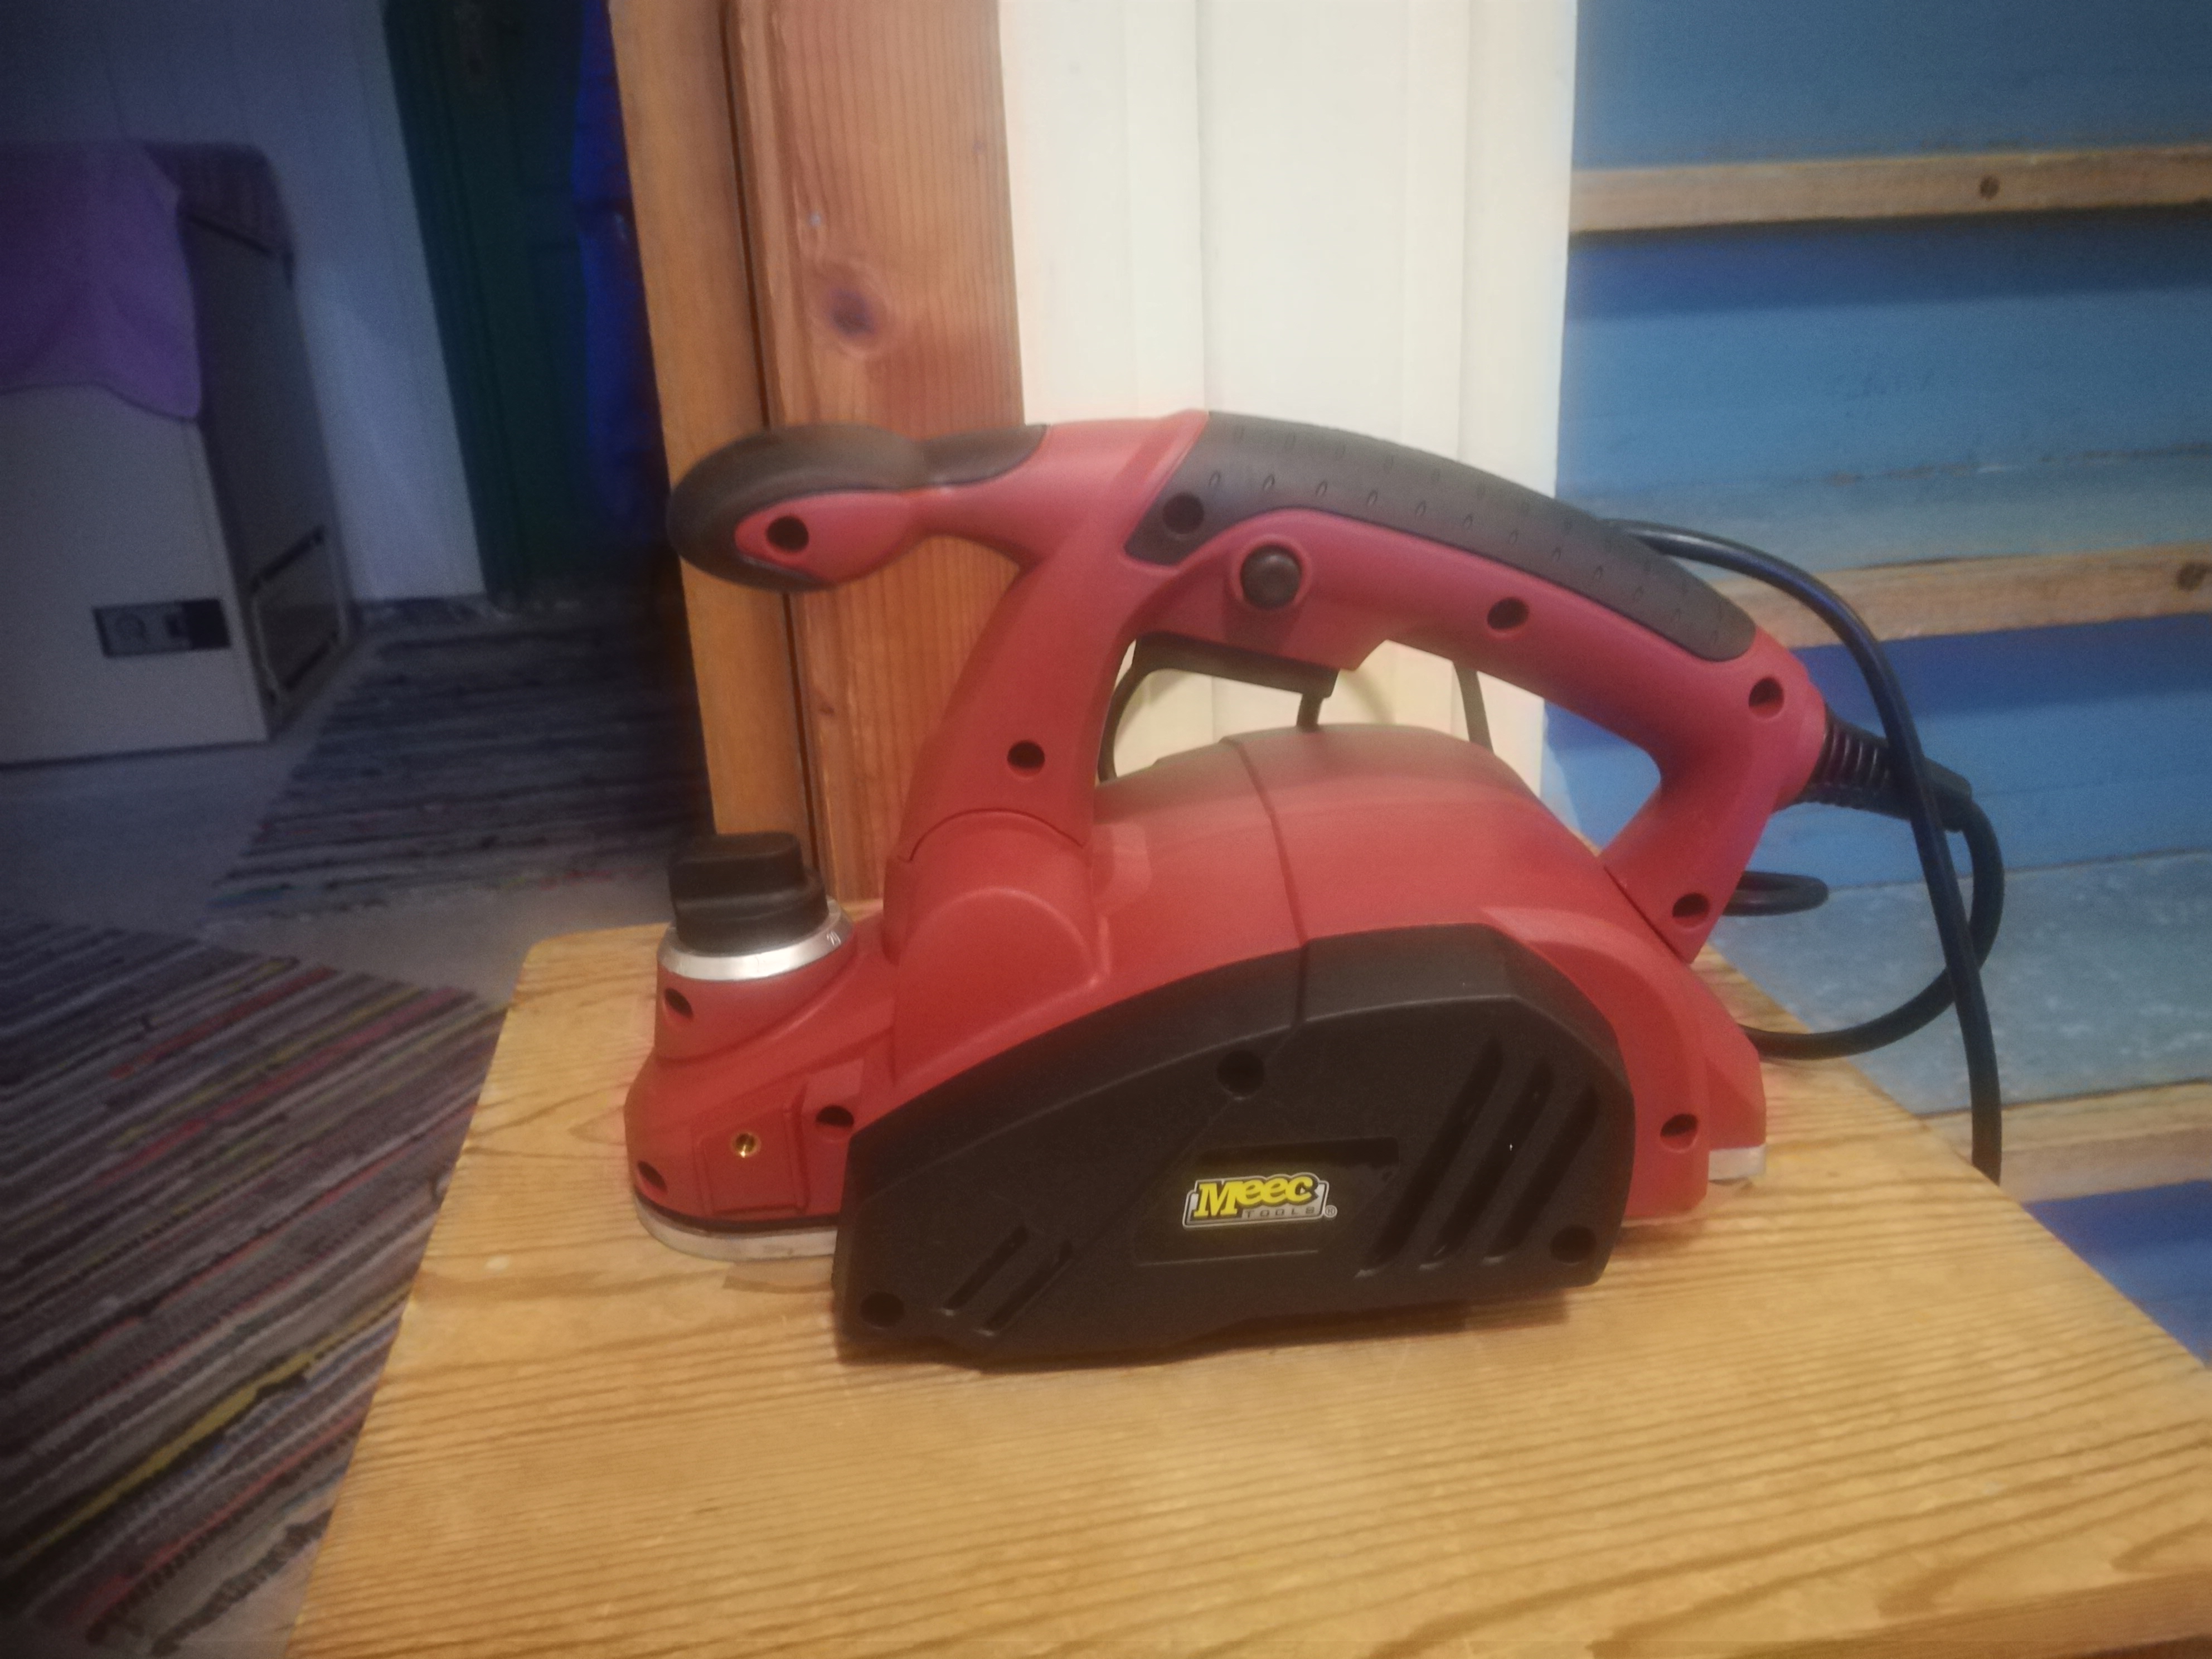
Meec Electric Plane

Yesterday, was the first time that I have used an electric plane. It is considerably heavier than the manual jack plane that I am used to. While not absolutely necessary, its operation feels better using two hands. It was used to trim MDF board so the same dimensions as the frame underneath. This is not a task that I would even contemplate with a manual plane. One could argue that an electric plane is not essential for this task. An alternative approach would be to use a router with a flush trimming bit. The challenge, in Norway, is that it is impossible to get 50 mm bits. So, in reality there is no alternative to an electric plane.

At the moment I have not had to sharpen the plane knives, although using them on MDF will require them to be sharpened soon.

I have no complaints with the Meec plane. It is solidly built but heavy, weighing 3 kg, despite an aluminum base plate. It offers 900 W of power, with a knife width of 82 mm, allowing it to cut from 0 to 2.5 mm in depth. It operating speed is 16 000 rpm. Unlike many other electric planes, this uses 3 double-edged knives. This means that the knives are reversible. The plane is equipped with a dust port that can be connected to the shop dust extraction system. It came with a parallel guide and a depth guide, as well as a dust bag and an extra drive belt. It cost NOK 600 (USD 78).

In comparison, a Bosch PHO 2000 electric plane has 680 W of power, the same knife width (82 mm), but a maximum cutting depth of 2.0 mm. It weighs 2.4 kg. The Bosch operates at a higher speed, 19 500 rpm. It provides only 2 knives, but they are easier to remove. At NOK 1 200, it costs twice the price of the Meec.


Workshop Tools: Hammer Drill

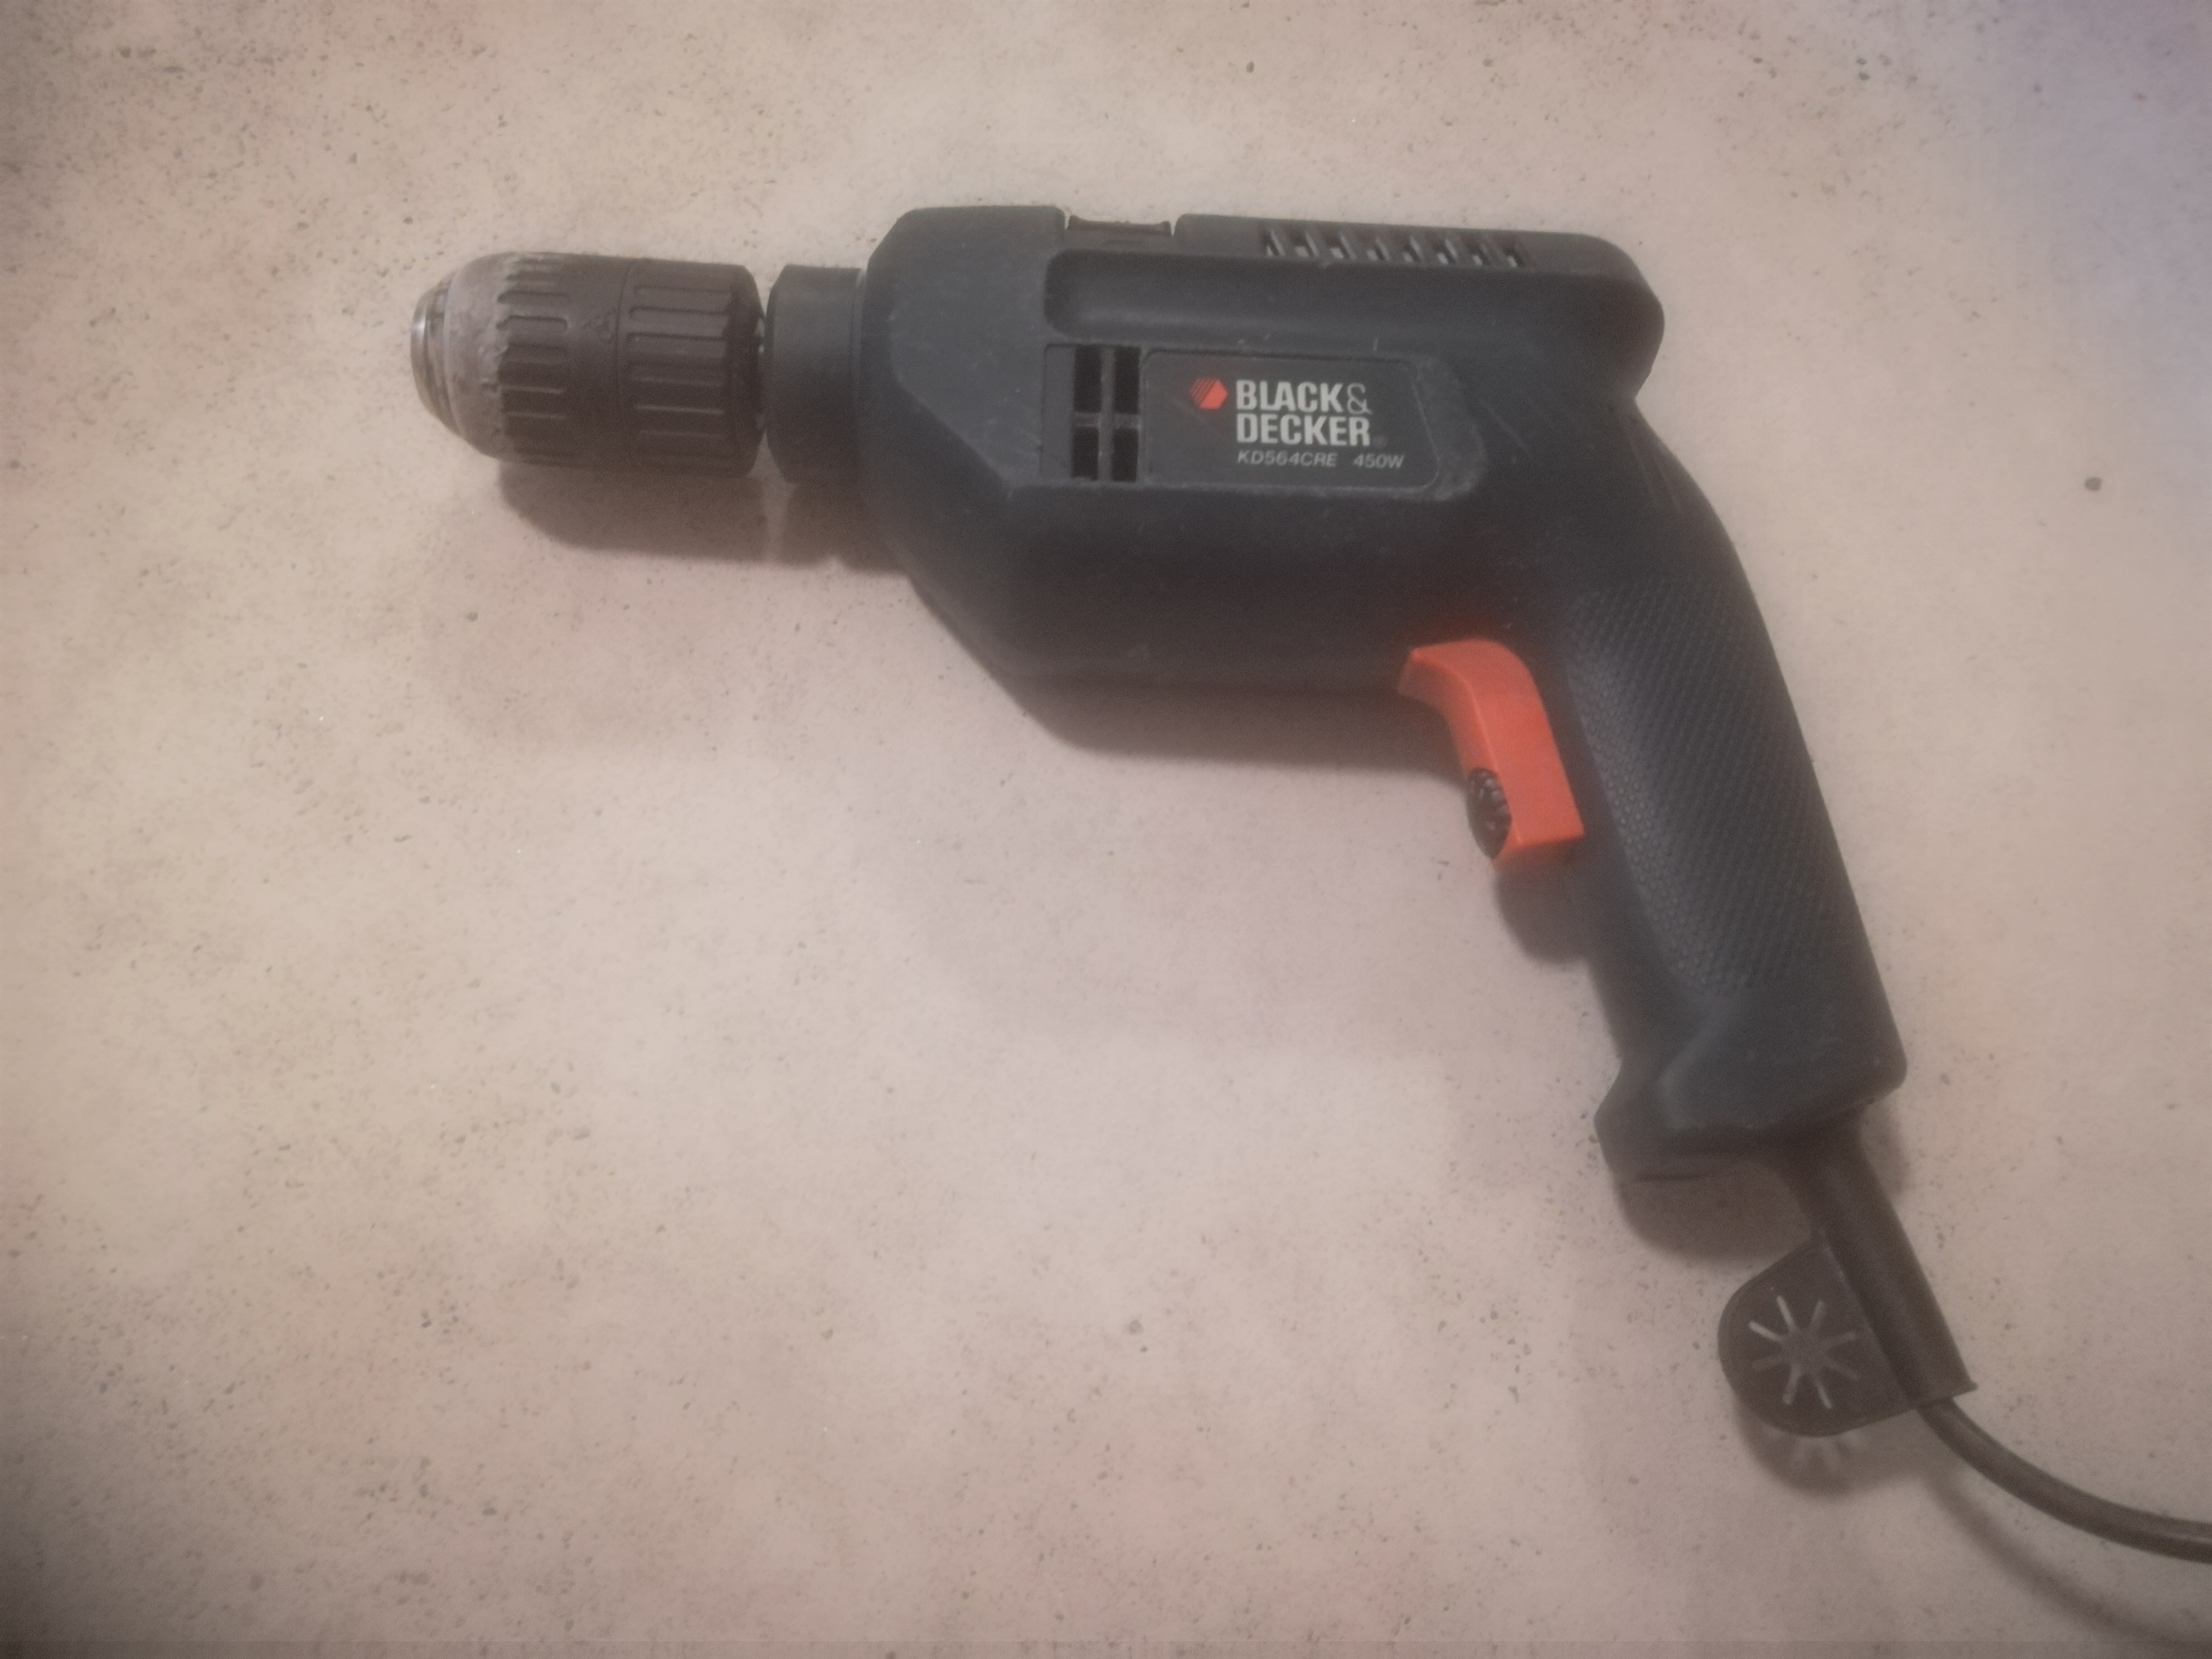
On 24 June 1996, I purchased a Black & Decker electric drill. Tools at the time were much more expensive than today. This drill cost over NOK 1 000 (USD 200). Until now, I have been happy with that purchase, and the drill works well even after more than 20 years of use. My wife fondly remembers using this drill to screw in all of the boards on the sun deck. Today, this faithful tool was transferred from the workshop to assume new, and less demanding, duties in the house.

bmd
Black & Decker Hammer Drill from 1996. It cost over NOK 1 000 (USD 200).

The main problem with this drill is not its colour, or its age. It is its lack of power. With only 450 W it is unable to do the work required of a drill in the workshop. Constructing work benches, I have to connect 48 x 96 mm boards with almost 100 each of 5.0 x 90 mm screws, and 6.0 x 160 mm screws. Both types are self-tapping production screws. The B&D was unable to drive the screws in without pilot holes. Even then, it would stop, refusing to move forward, so that an old man could demonstrate his strength driving the screws home, by hand.

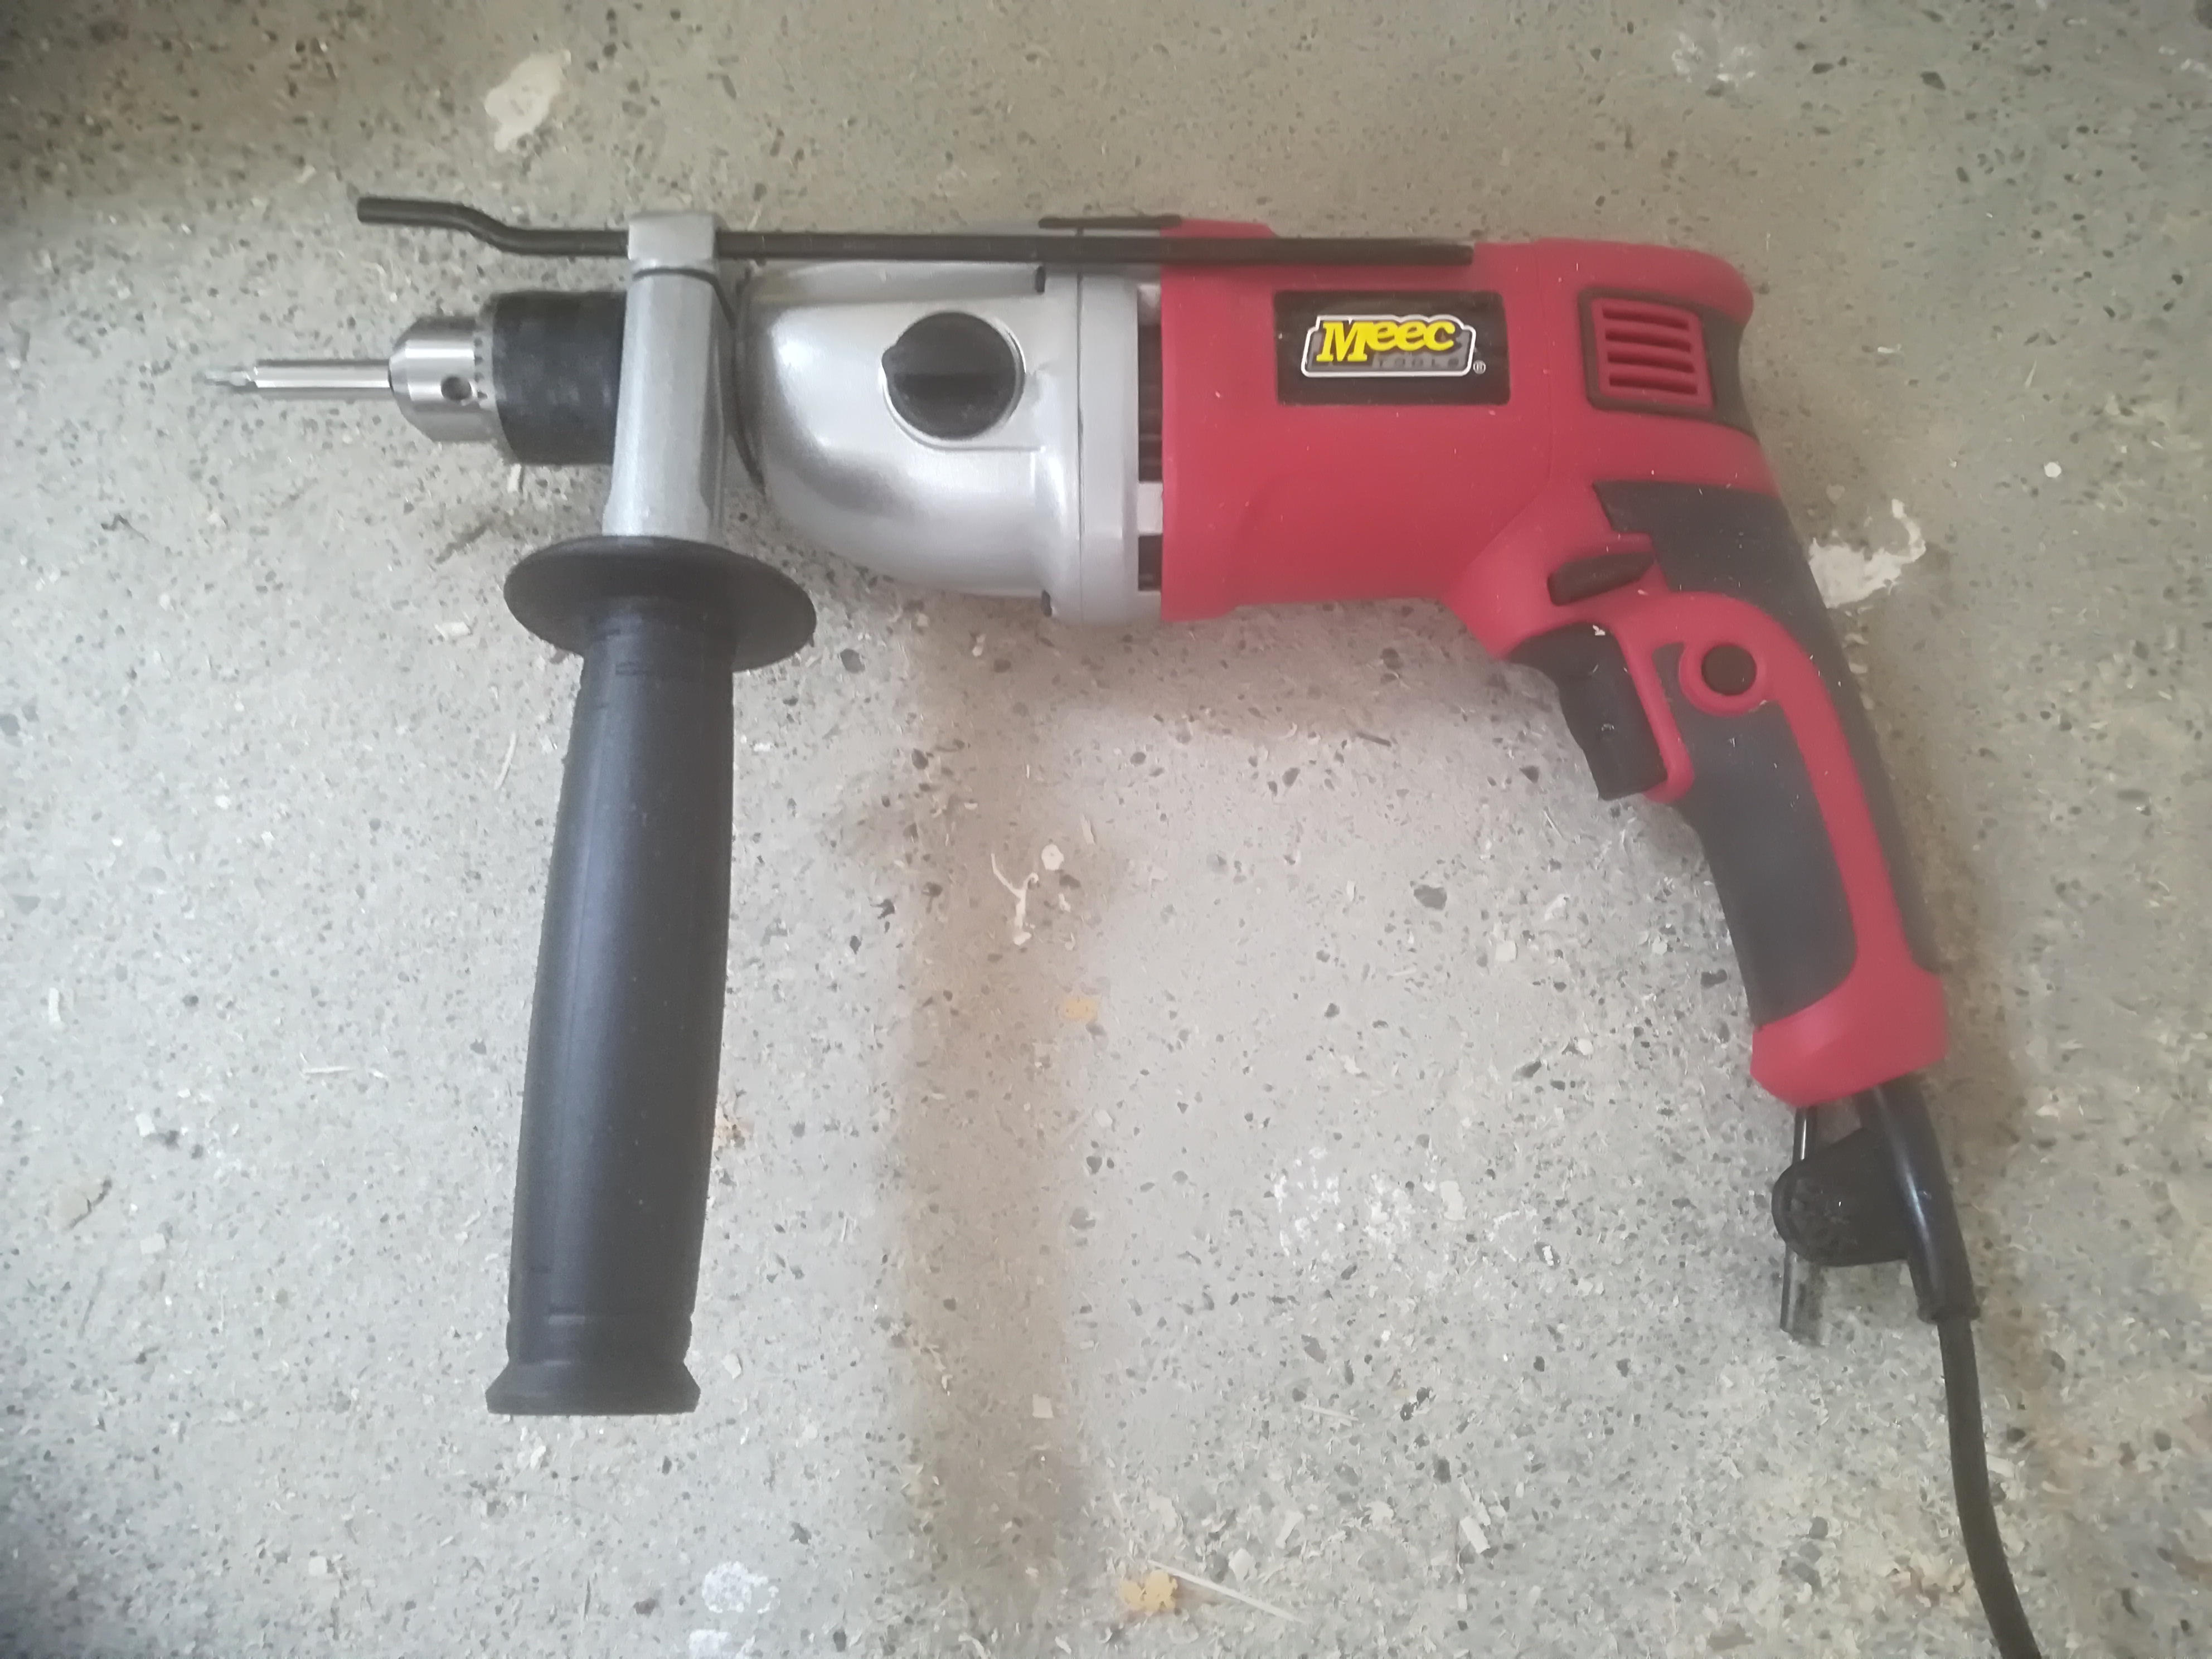
On Wednesday, 7 March 2018, a replacement drill was purchased. It is a Meec Red 000 110 hammer drill. It cost NOK 600 (USD 77). It provides 1 150 W of power. Two other differences are: 1) a keyed chuck, and 2) two gears. Otherwise, both are functionally very similar.

bty
Meec Red Hammer Drill, new in 2018. It cost NOK 600 (USD 77).

The advantages of using this hammer drill were immediately apparent. First, compared to a key-less chuck, a keyed chuck is able to hold drill bits more securely, and it is easier to release them again. Second, rather than attaching masking tape onto a drill bit, it provides a depth gauge attachment. Third, it comes with a grip, so that both hands can be used to hold onto the tool. A related disadvantage is that this new drill is considerably heavier, so there is a greater need for a grip.

This drill was able to take advantage of the self-tapping screws, and was able to power them completely in. There was no need for any pilot holes. In general, this drill seems to be capable of providing the power a portable workshop drill needs.


A Simple Picture Frame: Design

Time. It passes so quickly. I estimate that we have had one particular painting now for about 30 years. It measures 605 x 950 mm. The stretchers are approximately 12 x 40 mm with mitre cuts. The artist attached drawings with the painting, so it could be framed, but that was not done.

Product Design

The artist suggested using 1 x 3 lumber. Rough sawn, it is 25 x 75 mm; dressed 4 sides, it becomes 19 x 65 mm. I will be using 21 x 70 Nordic pine, pre-painted in white. This colour was specified.

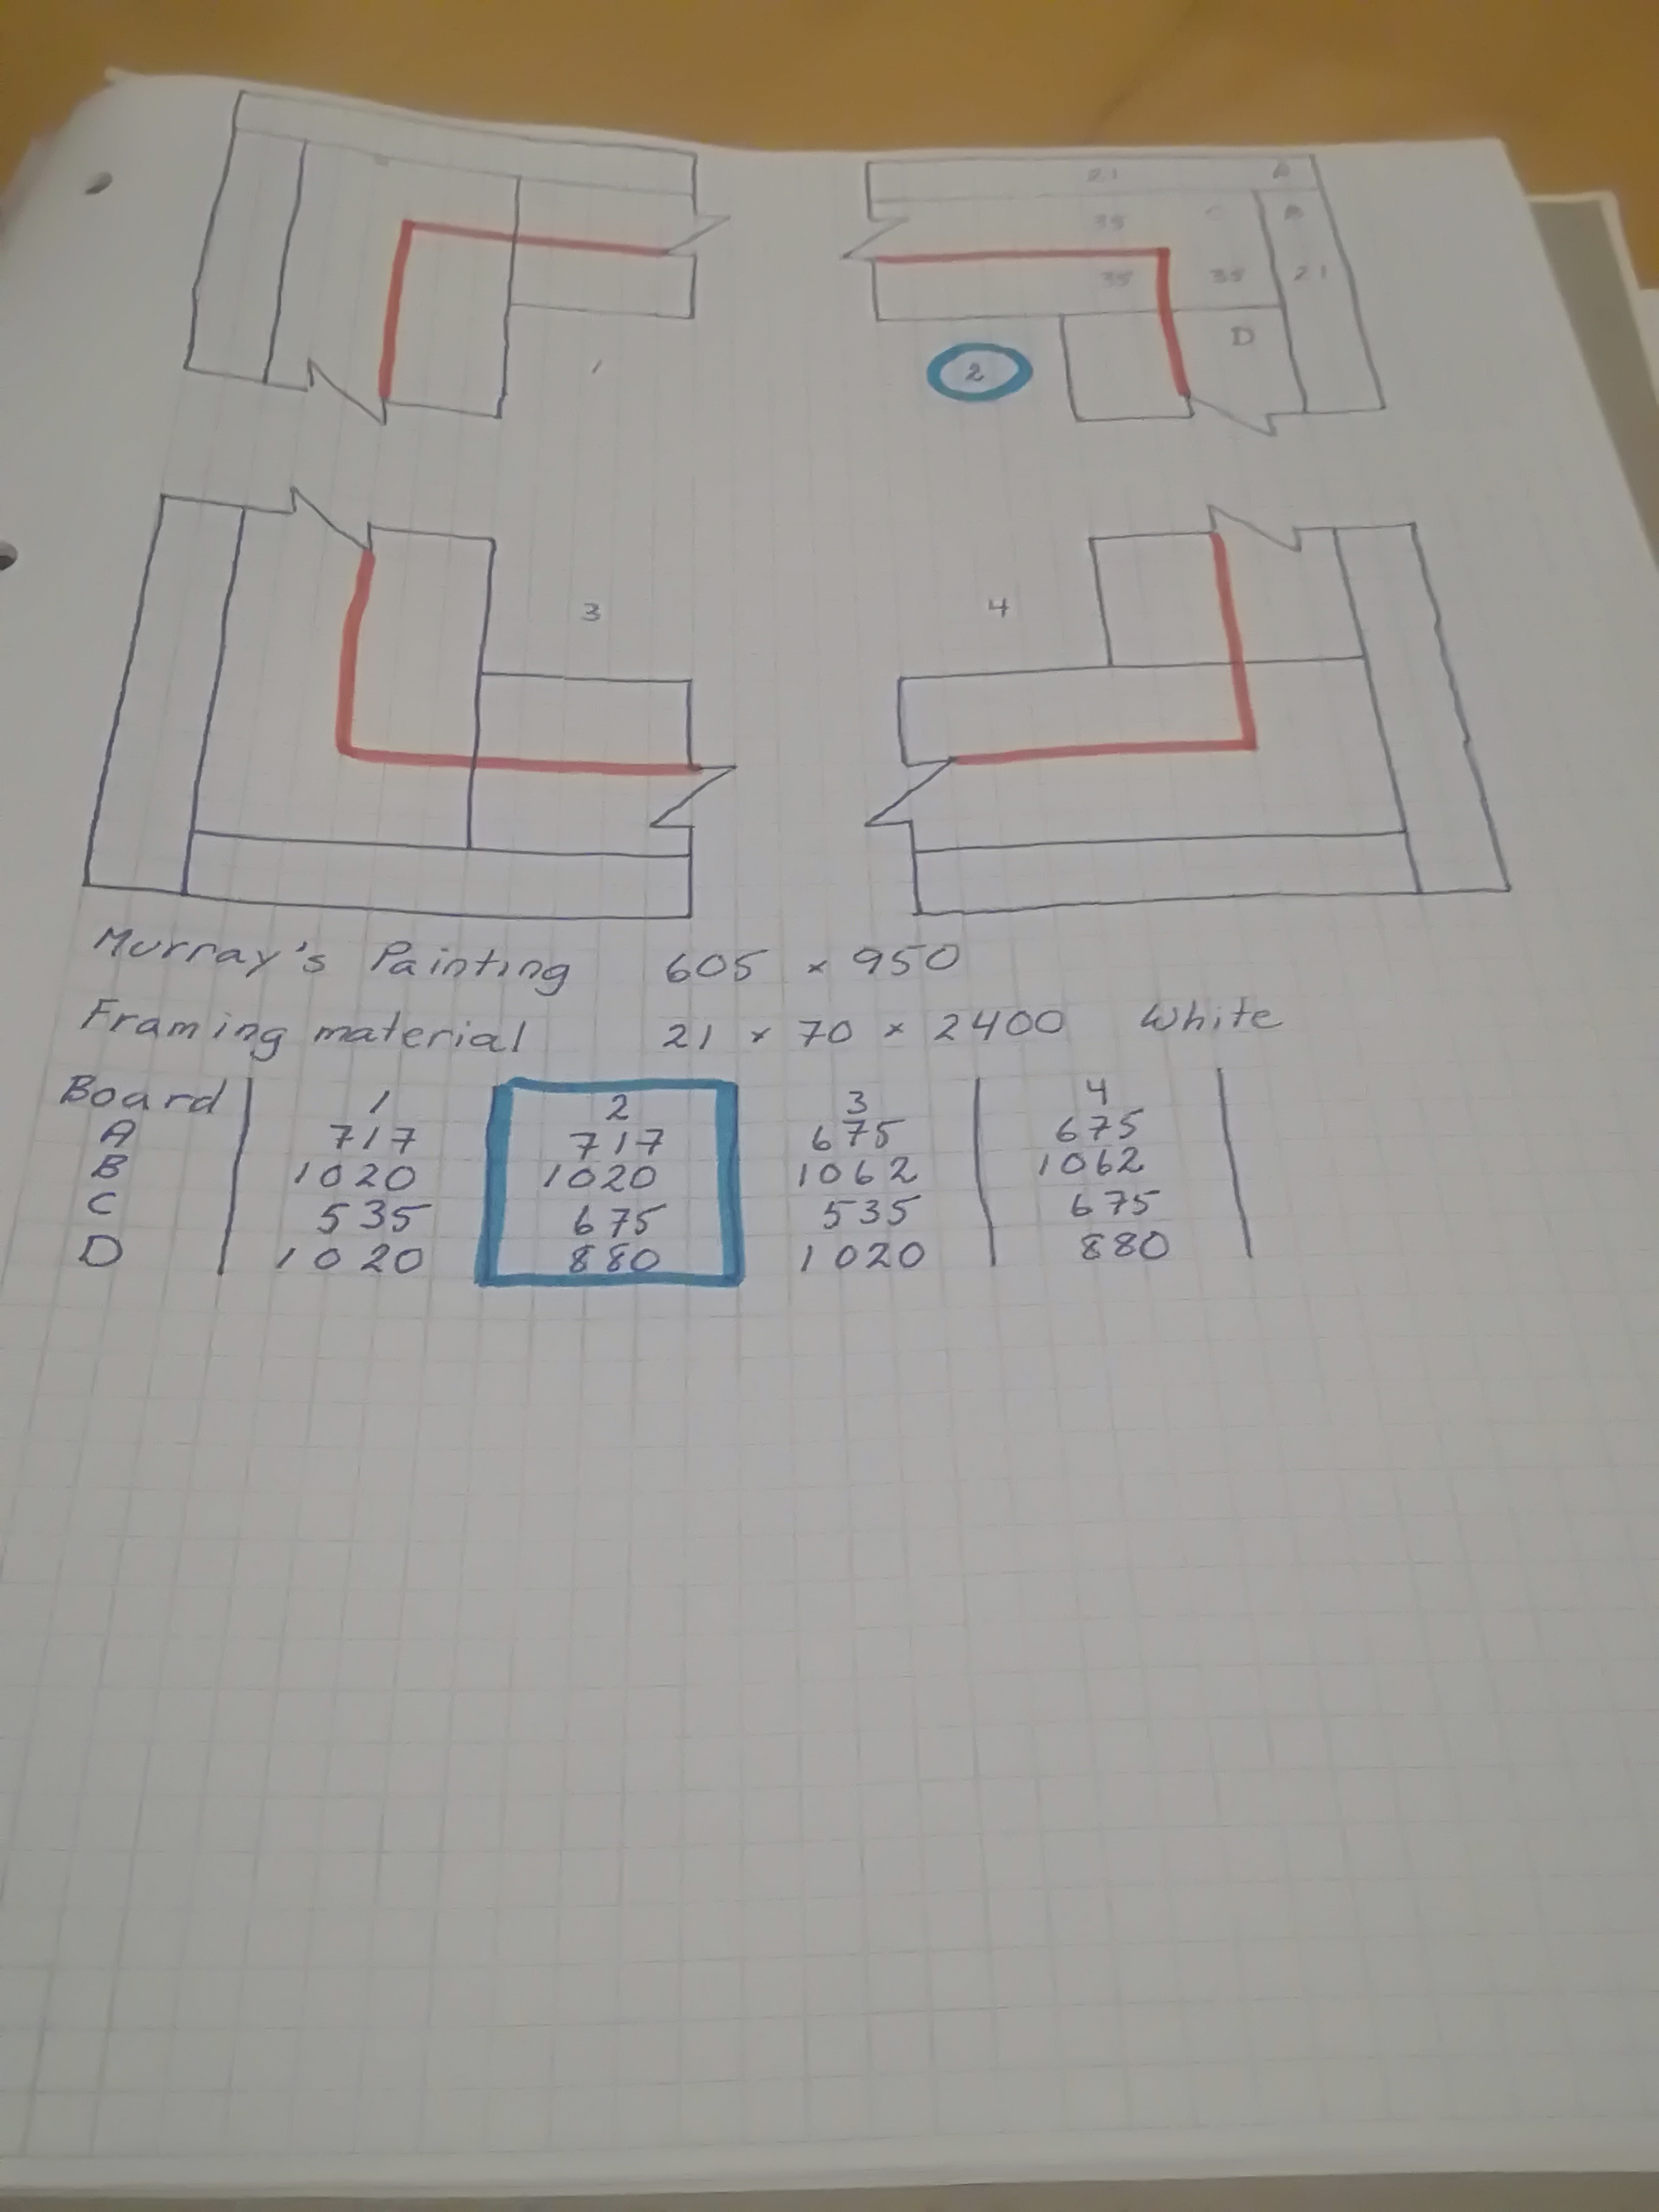
The frame will be made from 8 pieces of wood, four pieces are on edge, forming a perimeter protecting the painting. The other four inside will provide a flat surface for the attachment of the artwork. There are at least four ways to put these pieces together, as shown below. I believe the artist suggested design 2. This is what I will be making.

bty
Drawing of 4 designs for a simple frame. I believe Murray’s drawings for the frame where similar to Design 2.

At the moment, the design distance between the painting and the frame is 35 mm. Reflecting on this, it seems too generous. Excessive. Before anything permanent is done, I will make a jig, and invite comment. I suspect that the gap will be changed to somewhere between 30 and 10 mm. I suspect it will look best if the distance is the same as the thickness of the frame on edge, 21 mm.

If any change is made in this dimension, then the cutting list becomes invalid. A new one will have to be produced. It is good that design activities like this are actually fun! Have I considered using a spread-sheet? Yes, but my brain needs the opportunity to calculate more than I need instant gratification.

Production Design

Materials

  • 3 each 21 x 70 x 2400 Nordic pine lumber, pre-painted in white.
  • masking tape
  • wood glue
  • 1.2 x 40mm brads
  • white paint
  • 4 each spacers Ø = 15mm x 10 mm
  • screws 4,0 x 40 mm

Equipment

  • cross-cut saw
  • brad nail gun
  • 90° assembly jig
  • Torq T20 screwdriver

Process

Using a cut list that details the cuts to be made on each board, place masking take on the board where it is to be cross-cut. Measure the length and cut. Remove masking tape.

Assemble the pieces one corner at a time in the assembly jig, fasten with glue and brads. When all four corners are complete measure diagonals to ensure the frame is square. Adjust as necessary. Clamps should not be necessary.

There should be 4 ends, each 21 x 70 mm, that require painting. Paint.

The stretcher of the painting will be attached to the frame using stainless steel wood screws to prevent damage to the painting. The painting will only be attached at four points. Two screws will be attached onto the top stretcher, and two onto the bottom, 60 mm in from the side and 20 mm in from the top/ bottom. Between the frame and the stretcher there will be a 10 mm thick spacer.