Electric Car Charging

Everyone is on familiar terms with the watt, with the possible exception of American muscle car owners addicted to horse power. To help them enter a world free of fossil fuel, all they need to do is make a simple, if slightly inaccurate, calculation: 1 HP = 750 watts.

If one uses 1 watt for 1 second, then the amount of energy used is 1 joule (J). There are many other, but more confusing, ways to explain this energy transfer: the force of 1 (N) newton acting on that object through a distance of 1 (m) metre; (In electrical terms) the energy of 1 (A) ampere passing through a 1 (Ω) ohm resistor, with a voltage drop of 1 (V) volt, for 1 (s) second.

To be true to the SI system, the battery pack on your favourite vehicle should be expressed in joules, in precisely the same way that the power you purchase from your household electrical supplier, should also be expressed in joules. Instead it is expressed in an illegitimate kilowatt hours where 1 kWh = 3600seconds/hour x 1000 W/kW joules or 3.6 (MJ) megajoules.

The standard size of an EV is quickly approaching 60 kWh = 60 x 3.6 = 216 MJ.

The limiting factor in most houses with respect to charging, is the thickness of the electrical wires. In general wiring requires cable with the following characteristics: 10A = 1.5mm2; 16A = 2.5mm2; 20A = 4mm2; 32A = 6mm2; 40A = 10mm2; 50A = 16mm2; 63A = 25mm2. Electrical input to Cliff Cottage uses 230 V, 3-phase, 25mm2 wiring, which provides a maximum of 25 kW of electrical power to be used for everything and anything, including EV charging.


Standards

Details about charging EVs are contained in several standards, including IEC 61851 and IEC 62196.

IEC 61851 Electric vehicle conductive charging system specifies general characteristics, including charging modes and connection configurations, and requirements for specific implementations (including safety requirements) of both electric vehicle (EV) and electric vehicle supply equipment (EVSE) in a charging system.

IEC 62196 Plugs, socket-outlets, vehicle couplers and vehicle inlets – Conductive charging of electric vehicles is based on IEC 61851.

The IEC 62196 Type-2 connector (Mennekes) is used for charging electric cars within Europe. The connector is circular in shape, with a flattened top edge and originally designed for charging at between 3 and 120 kW, using either single-phase or three-phase alternating current (AC), or direct current (DC). In January 2013 it was selected by the European Commission as official charging plug within the European Union. It is also the official charging plug in Norway. There is a transition period until 2020, which will allow other charging plugs to be used.

At the moment there are only three vehicles that use this plug as standard in Norway, Tesla Model S (up to 22 kW), Renault ZOE (up to 43 kW) and Mercedes-Benz B-Klasse (up to 11 kW). Because the requirements are more stringent for these chargers, Renault includes the electrical installation of its residential charging system in the price of the vehicle.

Norwegian requirements for charging of EVs have been specified in the following document (in Norwegian): https://www.dsb.no/lover/elektriske-anlegg-og-elektrisk-utstyr/tema/elbil—lading-og-sikkerhet/

While other makes and models currently use other charging systems. As new models are introduced, they will increasingly use Type-2 charging as standard. However, it is interesting to see that the Hyundai Ioniq and the Opel Ampera-e, both introduced in 2017, both come equipped with Combo CCD (DC) charging cables.

With Type-2 charging, the electronics is in the charging station (Mode 3) instead of in a box attached to the charging cable (Mode 2).  This makes the cable cheaper to  purchase and easier to handle. The contact is more robust, with minimal electrical, heat and fire risks.

Type 2 charger cable (photo: Ståle Frydenlund)

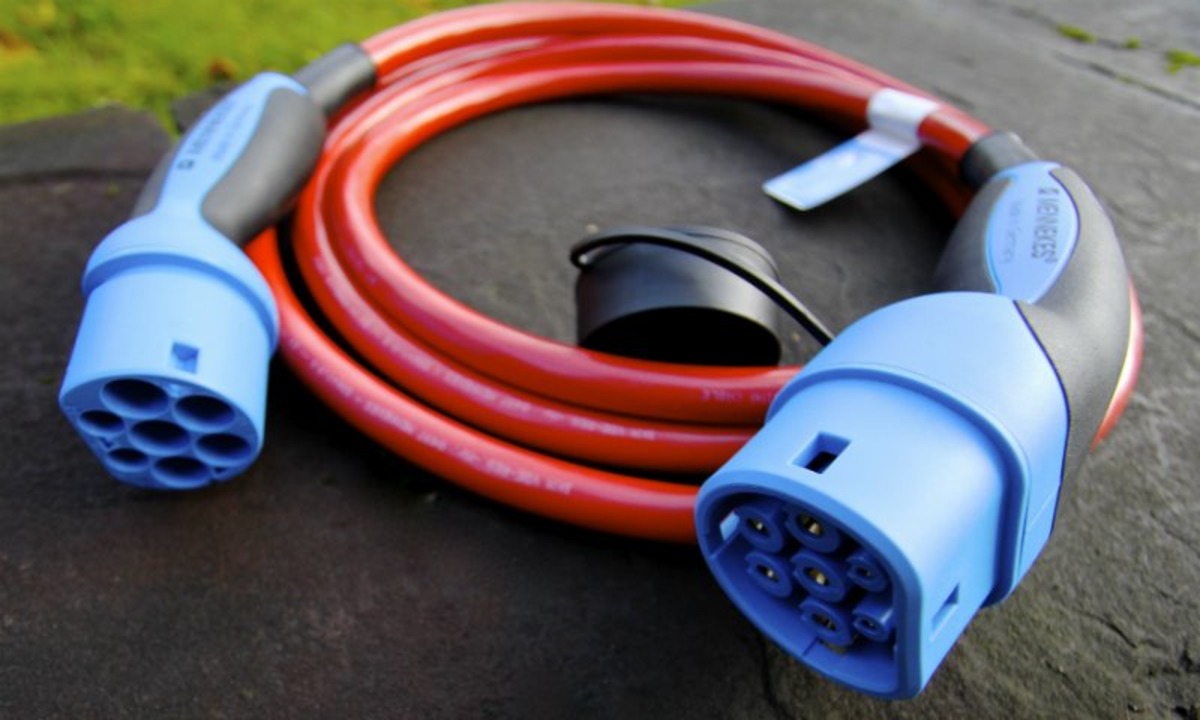
Charging cables are needed in different variants depending on the electric car. At one end of the cable there will be a Type 2 connector to plug into the charging station. The other end has a contact designed for the specific electric car. Type 1 for Nissan, Mitsubishi, Kia, Peugeot and Citroën; Type 2 for BMW, Volkswagen, Tesla and Renault.

Charging Key and Chip

Access to charging stations is restricted, to prevent abuse. Most commonly access is dependent on the use of a standard key, or a chip. At most charging stations in Norway, use is free. Yes, that is correct. Vehicles gets filled up with electricity free of charge.

Because membership is included with most new EV purchases, it is standard practice for Norwegian electric car owners to be members of the Norwegian Electric Car Association (Norsk elbilforeningen) which, in addition to other services, provides members with both  a charging key, as well as a charging chip, to give them access to charging stations throughout the country. While the key is used with most older charging stations, newer ones rely increasingly on a charging chip. Note: the charging chip will not work until it is registered with the individual charging operator!


Measurements: Length & Volume

This post was initially written as a comment to a YouTube video by Steve Ramsey (WoodWorking for Mere Mortals) titled, Metric or Imperial Measurements: Does it matter in the workshop? 

It is standard practice on metric technical drawings to make all dimensions in millimeters. This eliminates the need to write mm everywhere, and it is assumed that the accuracy is within 1 mm. For metals, one should be using a metal measuring device that will automatically compensate for temperature changes, or work at a standard temperature.

Length

One secret of using metric lengths, is to physically separate meters from the remaining millimeters. I treat these as fractions of a meter. My experience as a teacher, is that many people are blind to large numbers. They may be able to understand 36 mm, or even 254 mm, but at some point numbers go off scale, and are interpreted in that person’s brain as a big, meaningless numbers. Taking the video’s example of a table at 1676 mm, it looks and feels like a large number, too large to understand. Therefore, I separate the meters, and write the length as 1 676. The space after the meter measurement is a key to understanding. In this case, there is 1 meter, and about 2/3 of a meter (676/1000). The reason I use a space rather than a comma, is that I live in a country that uses decimal commas, rather than decimal points. Space, comma, period it makes no difference, as long as one can see the separation.

Steve complains that the individual markings for millimeters on metric scales are confusing because the millimeter lines are the same length. I have to agree that the imperial measures are more readable because they have different line lengths for feet, inches, half inches, quarter inches, eighth inches and sixteenth inches. Metric tapes tend to distinguish 10 cm = 100 mm, 1 cm = 10 mm, 5 mm and 1 mm.

A dual metric/ imperial tape. The imperial measurements can be easier to read!

Volume

The same approach can be used with metric volume measurements. There are two important volumes, the cubic meter and the litre, where 1 000 liters = 1 cubic meter. Once again, by separating out the value with a space after three digits, one is able to process the information better visually.

For values less than one liter, the millilitre is used. Here, I use a decimal delineator – a . (period) rather than a , (comma) to separate the value. Once again, both approaches are used in different parts of the world.

I try to avoid all conventional units such as teaspoons, tablespoons, cups and even the notorious dash.

An Amusement

Looking for suitable units to use when discussing volume less than one litre, I tried to find something familiar to work with – Root beer! At one site, I came across the recipe for California Root Beer, and decided to have a look. Using the site’s automatic metric converter, here is the result for 1 serving of California root beer:

28.35 g Coffee Liqueur

28.35 g Herbal Liqueur

56.70 g Club Soda

28.35 g Cola

1 Splash(s) Bitter Beer

This recipe is amazingly accurate, right down to 0.01 grams. There are no scales in the house that are that accurate! The original units in the recipe were liquid ounces, however, so these values should have been expressed in litres, except for the splash of bitter beer, that remains the same in both systems of measurement. With this recipe, the only thing missing is the root beer!

An Aside:

Yes, I have written my last measurement of grain expressed in bushels. For those fortunate enough to grow up with the metric system here is a summary:

1 imperial bushel = 8 imperial gallons = 4 imperial pecks = 36.36872 litres

1 US bushel = 8 US dry gallons = 4 US pecks = 35.2391 litres

In school, these values, minus the metric equivalent, were memorized, but I had no idea what a bushel actually looked like until a librarian, and subscriber to this weblog, caught me cutting the grass one day, and commented that I had put the cuttings into a bushel basket, to transport them to our compost heap. Finally, at the tender age of 21, I was able to visualize a bushel!

A bushel basket

The Charm of Rebar

Today, it was 20° C and sunny, and I accompanied Trish to Ystgård gartneri (nursery) in Straumen. The first thing that one has to be aware of is Ystgård’s domain name, gartneri.no. Somehow, this little company located in the village of our municipal centre,  has managed to take possession of the generic name for an entire branch. Well done.

While Trish was admiring the plants, even asking for my input (“something red”) I was admiring other products, specifically the welded rebar on offer. Photos of which are attached for your visual pleasure.

The delightful arch in the foreground costs a mere NOK 1 300 = USD 160, while its more complex four sided neighbour, behind, costs NOK 2 000 = USD 245.

A Swing? This alluring two seater is available for NOK 6 000 = USD 737.

These captivating rebar masterpieces can be purchased for as little as NOK 700 = USD 86.


Eelo

Back in December 2017, 500 other people and I pledged €32, to become Prime Contributors to Eelo, an Android-based mobile operating system, without Google. Of course, there were lots of other contributors at other levels. Altogether, €94 760 was raised, on a goal of €25 000. Today my stickers arrived.

Eelo stickers arrived in the mail today, from France!

Gaël Duval, creator of Mandrake Linux, is the primus motor of Eelo.  I’ve always had a soft spot for Mandrake throughout its various incarnations, including Mandriva, and more recently Mageia, if only because of New Westminster’s Mandrake the Magician. Eelo has a focus on open-source software.  Eelo does not have a business model, as it is intended to be a non-profit project, with a product suitable for unsophisticated users.

Eelo is not a new Linux-based smartphone operating system. That is because building  a new OS on a wide variety of smartphone hardware will be too big a challenge. One of the reasons I’m backing Eelo is because of my experiences with Linux on my Asus laptop. Daily freezes just aren’t fun! Eelo is using the existing Android clone, LineageOS, as its starting point. LineageOS is a CyanogenMod fork. The core of AOSP [Android Open Source Project]/LineageOS is usable and works well – for geeks! Unfortunately, it is not working well enough for everyday users, which is why I have not installed LineageOS on my Huawei P10 lite.

There is a lot of work that has to be done. First priorities for the project are a launcher, notification system and control center. These are currently running in beta. The real challenge comes in removing Google Play Store, Google Play Services, and Google Services.

Eelo will use F-Droid and APKPure to installing programs. MicroG will be used to replace Google Services. This is an open-source implementation of Android user space apps and libraries. SafetyNet will be replaced with Magisk Manager. Search will probably use DuckDuckGo and/ or Qwant or whatever the customer wants. Quad 9 DNS will be used for Domain Name System (DNS).

There are a number of other issues that have to be resolved, such as low-level proprietary smartphone hardware drivers.

Miracle Concrete

Concrete developed using graphene. Photo: Dimitar Dimov.

To experience a miracle just add graphene to concrete during the production process. Graphene concrete is twice as strong, four times as water resistant, with a smaller carbon footprint compared to the conventional processes. Graphene reduces the amount of materials needed in concrete production by nearly 50 percent and reduces carbon emissions by 446 kg per ton. Center for Graphene Science, University of Exeter, United Kingdom. See: http://www.exeter.ac.uk/news/featurednews/title_654766_en.html

It probably will not be commercially available for fixing the terrace this summer.

Sealing Concrete

Part of the problem, a concrete slab poured as a foundation for a house extension, but used as the roof of a storage shed for the past fifty years.

Problem

I live in Norway in a house built in 1963. At some point in the 1960s or 1970s, a large concrete slab was poured with a carport underneath half of it, and an outdoor storage age under the other half. This slab was at first intended to be the site of a house extension. However, the extension built in the 1980s, was in a different location. Instead the slab was used as a deck or terrace. Because of a sway in the concrete, half of the slab – that over the carport – was removed in the 1990s, and replaced with a wooden structure. Now it is time to rehabilitate the rest of the slab so that the storage location underneath can be used more extensively (2018), with wooden terrace boards covering the concrete (2019). The concrete needs to be waterproofed, or sealed!

Approach

A concrete building is probably more waterproof than any other common type of structure to begin with, and only cracks, joints, or window and door openings require attention. Some people have suggesting beginning by approaching the problem from three different ways. First, grind rough, uneven concrete so that a waterproofing membrane or slurry has an even surface to adhere to. Second, fill expansion joints or larger cracks up to 6 mm, with polyurethane caulking. Third, fill joints larger than 6 mm, with a concrete patch, which must be completely dried before proceeding further.

Some sources suggest waterproofing only walls with soil on one side and habitable space on the other, but extending this waterproofing to adjacent surfaces by at least 300 mm. Others disagree, and suggest that all concrete surfaces (in wet climates, especially) should be treated.

A cast in place concrete roof typically uses roofing cement and fiber reinforced roll roofing to prevent water intrusion. The challenge with this project is that the roof was never built as a roof, but as a foundation. Other sources comment that if a structure lacks sufficient slope to allow water drainage a tar or synthetic or seamless rubber waterproofing membrane has to be used.

Another popular comment, is that waterproofing won’t work without adequate drainage. This may require a perimeter footing drain or other drain pipe system. It may even require  a sump pump.

Preparation

Sweep the surface to remove dirt and debris.

Test to see if sealer has been previously applied, by pouring a large cup of water onto the concrete. If the water beads up and stays on the surface, it’s been previously sealed. If sealer has been previously used, it will have to be removed using an acid-based chemical stripper, requiring protective clothing, gloves and eyewear. Less toxic and more environmentally friendly products made from soy or citrus are also available, but take longer to work. Using a 25 mm nap roller spread a thick coat of the stripper onto the concrete. Wait. Scrape using a long-handled scraper to remove the sludge. Discard sludge.

If necessary, clean the surface with a stiff brush.

Scrub the floor with TSP (trisodium phosphate) and water to remove loose material, oil and dirt. Let dry.

Sealing/ waterproofing the concrete. Select one (or more) of the following:

1. Concrete repair sealant fills cracks and pitting using a putty knife.

2. Liquid membranes, polymer-based coatings that can be sprayed, troweled, or rolled onto concrete directly, are quick to apply and low cost, but give uneven coverage.

3. Self-adhering sheet membranes are large, rubberized asphalt membranes that are peeled and place directly onto the concrete. They provide even thickness, but are more expensive. They are extremely sticky that is impossible to un-stick it once it is laid. Pay attention to overlap, as improper installation can result in leakage. Cut lap joints properly. Two people are needed to install.

4. EIFS, Exterior Insulated Finish Systems, offer a durable, attractive and simple coating to exterior concrete walls, providing insulation and waterproofing. For a stucco-like finish, an EIFS finish coat can be applied directly to the concrete, filling voids and minor irregularities, and creating a good moisture resistant surface. It is applied with a trowel, and comes in 20 liter buckets premixed and tinted. Float with a Styrofoam block or rubber float to create a uniform surface and texture. Other EIFS products may be sprayed, brushed, or rolled on with a paint roller.

5. Cementitious waterproofing is easy to mix and apply. Mix with an acrylic additive for a better bond, and apply with a long-handled brush. It lacks elasticity, making it prone to cracking over time.

6. Sodium bentonite is a green approach to waterproofing. It is able to cover smooth as well as coarser surfaces.

7. Concrete sealer needs to be applied in dry conditions, because it won’t adhere to damp concrete. Temperature above 10°C during application and three day drying period. Apply two thin coats to ensure a smooth and even finish. Apply the first coat. Wait at least two hours before applying the second, at right angles to your first coat. Do not step on or otherwise use the sealant covered surface until it is completely dry. This can take up to three days.

Note: The information above has been obtained from various sources (online, written, oral) to aid in the solution of a particular construction problem that I face. Your problem is probably not identical, and you too will have to sort through a maze of opinion to find appropriate solutions.

I have not tested any of these proposed solutions, and cannot verify any claims about them. Risks associated with the proposed work have not been assessed, but construction of any sort can be a hazardous activity. Anyone following these instructions does so at their own risk. People who have experience with these methods are invited to share them in a comment.

Life under Late-Capitalism

Mike Small describes himself as a social ecologist, Scottish socialist and republican.  Others describe him as an activist, writer and publisher, having  founded Product magazine: , launched as Red Herring in 1998. He is also editor of Bella Caledonia. Mike is from Aberdeen, Scotland.

At the end of April, Mike left us some guidelines for living under late capitalism.

He begins by stating that we will buy all of our goods. There is no mention of making them, or bartering them. There are only two sources: Ikea big boxes and Amazon online. The quality of foodstuffs is questionable.

The interested reader is still free to read the original document, with many comments reflecting current events. At 660 words and 2 photographs, it is a fairly short read. Yes, big brother is there, using Facebook, or equivalent, to herd everyone to an acceptance of their fate. Celebrities deserve their fame and riches!

The rest of us, “…will be connected to a global ‘network’ which will monitor your activities, provide you with leisure, sexual stimulation and steer your political actions. This will be provided for free. You will at all times hold a device which will give you ‘notifications’ from the network. It will bleep and ping when you are to take notice. You will be provided with several platforms to express your views and chatter with others. This will be the last thing you do a night and the first thing you do  in the morning. Your children will also be attached to the network where they will be provided with games.”

Foodstuff activism, may have to join workshop activism, as a high priority activity. Imagine, secret covens of people dirtying their hands toiling with soil, with spades and hoes, producing food for themselves, their families, friends and others. Others may prefer hydroponics, geodesic dome greenhouses, LED lights and Arduino microprocessors. Will vegetable gardening become a crime? Will the acquisition of animal protein become a capital offense? I am not sure that I could enjoy producing protein from insects, but if necessary I could produce escargot, as an act of defiance.

If it becomes compulsory to wear devices, rest assured that my highest priority will be the design and manufacturing of a robot to simulate (read: “fake”) human existence. Perhaps the time has come for everyone to detach themselves from their devices … before it is too late!

People are encouraged to visit From Garden Warriors to Good Seeds: Indigenizing the Local Food Movement.

Yup, here it is – a logo. Not sure who to credit for it. “this tentative logo was created by Winona [LaDuke]’s staff.”

The Charm of a Bison

In a recent market survey undertaken by members of my immediate family, I discovered that not all aesthetic values are genetically inherited. Rather than being sad, this insight has given me the opportunity to explore new vistas. If people are not interested in revisiting sardine roles, sitting in a mini-van for days or weeks at a time, meditating on the spruce trees of Northern Sweden, I too can abandon the mini-van, and opt for something that reflects my new essence – the workshop activist.

So it is going to be, Au revoir, Berlingo! Hi, Bison! (or if I follow up what I wrote a few weeks ago, Hallo, StreetScooter Work!)

I have had relationships with pickups before. The very first vehicle I drove, in the very early 1960s, aged about twelve, was a Chevrolet Pickup belonging to Harry Raymer, in some fields in Okanagan Mission, near Kelowna, British Columbia, Canada. Later, in the early 1970s, I drove Ernie Jickles – whose eyesight was failing and was not allowed to drive – around in his wife’s Ford Courier pickup, so we could  photograph. The Courier was a rebadged Mazda B-1800. In the late 1980s, in Inderøy, I drove a Nissan pickup working on a lafted house project out in Malm.

A 1972 Ford Courier, a rebadged Mazda B-1800. The one I drove was light blue in colour, and belonged to the Jickles family, of New Westminster. (photo: Mr.choppers, 2014)

Forget the past. Today’s story is set in the future, about the Bison, a Dutch-Canadian electric pickup. The primary characteristic it attempts to portray is rugged durability. That’s almost how I describe myself, as do about 90% of the adult male population.

I’m not sure if it is a corporate, or a product motto, but LEADING THE CHARGE™ has both electrical, and military connotations. It also describes itself in terms of three other characteristics: power, precision, strength.

Characteristics of the Bison pickup, I think I understand:
1300 liters of exterior cargo space and 510 liters of lockable storage. Safest truck with carbon fibre reinforced steel space frame. Full electric AWD built for severe weather conditions. High-current power socket for all your tools. Advanced vehicle intelligence and connectivity. Zero emission driving and zero pollution. Dual-motor electric powertrain. Advanced telemetry.

Characteristics, I know nothing about:
Rugged off-road capabilities with 54% hill start and 21% hill climb. I guess this is important, because I live on a hill, but have no idea what it means beyond being able to start off on a hill. Yes, I am too lazy to google it.

Somewhere in between: Class-leading torsional stiffness for enhanced durability and handling. I know what stiffness is, but I thought one invested in a suspension system in trucks to softened up that stiffness.

I would like a person, or even a designer, to read the following paragraph, and tell me that it actually means something that I can use to impress friends: “The Bison speaks a bold design language, punctuated with angular cladding and wedge profiles. An evolutionary leap forward from traditional pickups, the Bison delivers a more modern and provocative approach. With short overhangs and tires pushed to the corners, the stance conveys stability and confidence allowing for aggressive approach and departure angles.”

Included for your visual enjoyment are photographs from the Bison website: http://www.havelaarcanada.com/bison/

Protective Gloves

While everyone knows that a glove is a garment covering the whole hand, not everyone is familiar with gloves as Personal Protective Equipment. There are 3 categories of gloves specifying levels of risk. Category 1 is for simple gloves, for minimal risks only. Cleaning and gardening gloves are often found here. Category 2 is for intermediate risks, those that are neither minimal nor deadly/ irreversible. This includes gloves offering good puncture and abrasion performance. Category 3 is for irreversible or deadly risks, and gloves in this category must be designed to protect against the highest levels of risk.

Work gloves for woodworking are classified in category 2. Some of the functions that that can be important are: protection against cold, protection against cuts, and water protection – either water resistant or waterproof. Durability and versatility are also important considerations. In addition, gloves should fit! Poor fit can reduce performance and/or protection, and increase the risk of chafing and injury.

The Guide 5002 glove for outdoor workers in fields as divergent as construction and kindergartens.

Glove size is dependent on hand width and length. To find circumference, wrap a measuring tape around dominant hand (without thumb) just below knuckles, and make a fist. To find length measure from the bottom edge of the palm to the tip of the middle finger. Despite standards, measurements don’t always help.

Personally, I have a circumference of 275 mm (EU-10), but a length of 210 mm (EU-11). However, after spending an hour at a local store selling PPE and attempting to try on several pairs, the results were: Size 10 was hopeless; size 11 felt tight; I ended up with a size 12, as shown in the photo below.

These red gloves, suitable for woodworking, were only available in one colour combination red and black. They were the only work gloves sold by the shop in size 12.


In Europe, there are a number of standards (EN = European Norm) for gloves. EN 420 provides general specifications, EN 388 defines levels of protection against mechanical risks (abrasion / cut / tear / puncture) and electronic discharge, while EN 511 addresses cold and wet issues. Other standards extend requirements for special uses, such as welding EN 12477.

EN 420 specifies some general requirements for protective gloves. For example, it requires that the gloves themselves should not impose a risk or cause injury; that their pH be as close as possible to neutral. It also addresses allergy issues. For example, chromium content is limited to a maximum of 3 mg/kg (chrome VI). It also specifies hand size requirements.

1. Resistance to abrasion

Based on the number of cycles required to abrade through the sample glove (abrasion by sandpaper under a stipulated pressure). Performance level 1 to 4, depending on how many revolutions are required to make a hole in the material. The higher the number, the better the glove. See table below.

2 Blade cut resistance

Based on the number of cycles required to cut through the sample at a constant speed. Performance level 1 to 4.

3 Tear resistance

Based on the amount of force required to tear the sample.
Performance level 1 to 4.

4 Puncture resistance

Working with electronic components can require that gloves be used to reduce the risk of electrostatic discharge. A pictogram will indicate if gloves have passed the relevant test.

EN 511 measures how the glove’s material leads cold (first digit, convective cold with performance level 0-4 where a higher number is better ), as well as its the material’s insulating capacity, with contact (second digit, contact cold with performance level 0-4). A third digit shows if water penetrates the glove after 30 minutes.

Many glove manufacturers have detailed information about their products, and protection standards. This is true of Australian Ansell Limited and the Swedish, Skydda Protecting People Europe AB, which markets products under the name Guide.

Living in Norway, I try to support Scandinavian companies.  Skydde PPE has its own YouTube channel. Most videos on the channel are in Swedish, unfortunately: http://guidegloves.com/en/guide/film.html At least two of their videos are made in Bergen to emphasize gloves that protect against wet and cold (in a kindergarden) in addition to mechanical injury (carpentry). Here the spoken Bergen dialect is texted into Swedish.


Workshop Tools: Gloves

Take a close look at the following photo, and you will see the hands of an idiot who was not following safety procedures. He was not wearing gloves.  Yes, he can find extenuating circumstances to explain away both incidents. The injuries are minor. That is not the point. Both incidents could have been avoided if gloves had been used.

Unnecessary injuries caused by not wearing gloves.

People who work with sharp tools should wear gloves. It should be part of the kit!

A glove, part of the safety equipment every woodworker should learn to wear.